
在分布式系统中通常要用到文件同步功能,一是为了备份,另一个原因则是用于代码的一致性,在查阅了大多数的关于Ubuntu 下利用rsync 同步的文章,发现没能有一个比较好的,或者说比较清析的文章来告知一些想用rsync 同步功能的人,现在我也仅仅做一些梳理,并提及我在配置rsync时遇到的问题,让大家好绕过这些坑,省下程序员宝贵的时间。
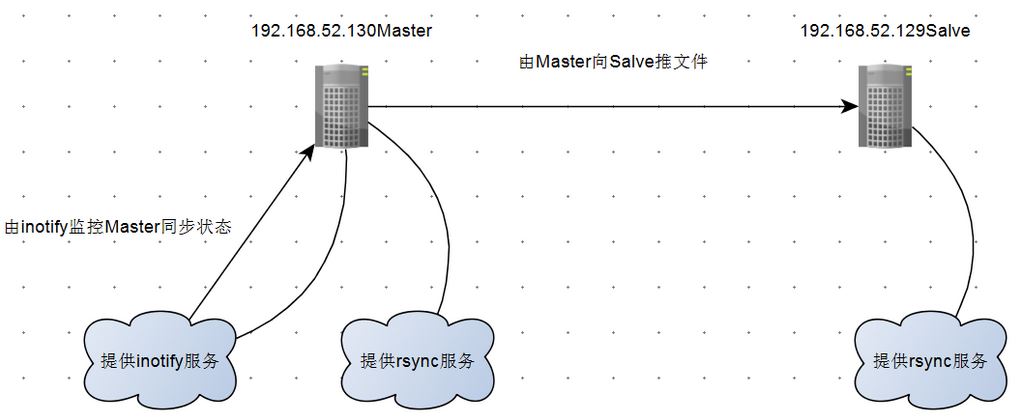
看一下需求具体化的图:
以实践为主导,啥也不多说,让服务跑起来。
一、在主服务器上(例中为192.168.52.130)
1.安装rsync
sudo apt-get install rsync
2.修改 /etc/default/rsync
sudo vim /etc/default/rsync
可以看到对于服务的默认配置,修改以下配置
RSYNC_ENABLE=true //设置开启同步
3.为了方便管理,添加rsync 文件同步的配置目录(目录可以自定义,没有规定)
sudo mkdir -p /etc/rsync/
4.建立同步时的密码文件rsyncd.secrects,在里面只放密码
#/etc/rsync/rsyncd.secrects
www-data
二、在从服务器上(例中192.168.52.129)
从服务器上的1,2,3步跟主服务器一样,装安rsync前开启同步,这边就不再累赘了
4.复制默认配置至步骤3中的目录下
cp /usr/share/doc/rsync/examples/rsyncd.conf /etc/rsync/
5.修改配置文件
# sample rsyncd.conf configuration file
# GLOBAL OPTIONS
#motd file=/etc/motd
#开户log日志
log file=/var/log/rsyncd.log
# for pid file, do not use /var/run/rsync.pid if
# you are going to run rsync out of the init.d script.
# The init.d script does its own pid file handling,
# so omit the "pid file" line completely in that case.
#指定pid
pid file=/var/run/rsyncd.pid
#syslog facility=daemon
#socket options=
# MODULE OPTIONS
[www-data]
#指定同步目录
path = /data/www/
use chroot = yes
# max connections=10
lock file = /var/lock/rsyncd
# the default for read only is yes...
#不只是读,还要写权限
read only = no
list = yes
uid = www-data
gid = www-data
# exclude =
# exclude from =
# include =
# include from =
#指定同步校验用户(与主服务中用于同步时用户相同)
auth users = www-data
#指定同步校验用户时的密码文件
secrets file = /etc/rsync/rsyncd.secrets
strict modes = yes
#指定host
hosts allow = 192.168.52.130
hosts deny = *
ignore errors = no
transfer logging = yes
log format = %t: host %h (%a) %o %f (%l bytes). Total %b bytes.
三、测试同步
Usage: rsync [OPTION]... SRC [SRC]... DEST
or rsync [OPTION]... SRC [SRC]... [USER@]HOST:DEST
or rsync [OPTION]... SRC [SRC]... [USER@]HOST::DEST
or rsync [OPTION]... SRC [SRC]... rsync://[USER@]HOST[:PORT]/DEST
or rsync [OPTION]... [USER@]HOST:SRC [DEST]
or rsync [OPTION]... [USER@]HOST::SRC [DEST]
or rsync [OPTION]... rsync://[USER@]HOST[:PORT]/SRC [DEST]
上面是一些rsync 语法的使用规则,具体可通过rsync –h 获得详细使用说明
sudo rsync -avzP --delete /home/user/test.log www-data@192.168.52.129::www-data --password-file=/etc/rsync/rsyncd.secrets
在上面命令是从192.168.52.130中运行的,www-data@192.168.52.129 这个www-data 与从服务中配置的auth users 是一致的, –password-file=/etc/rsyunc/rsyncd.secrets 中记录的密码须与从服务中一致,但仅记录密码,如下图比较示

在从服务器中要记录用户及密码用“:”分隔开。
测试结果如下在从服务器中已存在test.log文件

四、实现实时同步
1.对于上面的同步,并不能做到实时,在初期时,可能会做定时器做定时同步,但终究是不能达到业务需求的,所以还需要借助inotify
2.查看是否安装inotify
ls /proc/sys/fs/inotify
如果能看到
max_queued_events max_user_instances max_user_watches
三个值的话说明已经安装了,如果没有,则要通过apt安装
3.编写监控脚本(在主服务器上)
#!/bin/bash
#param
host=192.168.52.129
src=/data/www/
dst_module=www-data
user=www-data
rsync_passwd=/etc/rsync/rsyncd.secrets
/usr/bin/inotifywait -mrq --timefmt '%d/%m/%y %H:%M' --format '%T %w %f' -e modify,delete,create,attrib ${src} | while read file
do
/usr/bin/rsync -avzP --delete --progress ${src} ${user}@${host}::${dst_module} --password-file=${rsync_passwd}
echo "${file} was rsyncd" >>/var/log/rsyncd.log 2>&1
done
通过inotifywait 方式实时监控对应文件夹下文件的变化,具体看inotifywait 命令,这边不再累赘了。
最后对上面的脚本添加执行权限,并运行至后台进程,或是加入启动运行。
五、总结
1.由主向从推送同步文件,在主服务中不用配置同步配置文件,他只提供同步功能就可以。
2.在主服务器中要通过infotifywait 来实时监控要同步的文件。
3.在其他从服务器中要配置同步配置文件,并提供用户:密码格式的密码文件与配置文件中对应的用户。
4.inotify 服务会在多文件时报观察数太少问题,应该对/proc/sys/fs/inotify/max_user_watches下的值进行修改,以便填加观察数。
5.实时同步的同时为了提高同步文件的完整性,应在定时器中添加全量同步。