“站在岸上学不会游泳。”看了各种深度学习的新闻、有意思的paper,要开始搭建深度学习环境入坑了。昨天看到一视频展现了tensorflow在Android平台上的应用,感觉潜力巨大,所以选择了tensorflow。
结合几篇安装文章总结了安装方法,可能是最简便的一种了。
笔记本Y430p 显卡GTX850M
操作系统Ubuntu 16.04(经本人测试 14.04 14.10 15.04 15.10 对双显卡的支持都不是特别好)安装好后建议关掉所有更新选项。
python版本 2.7
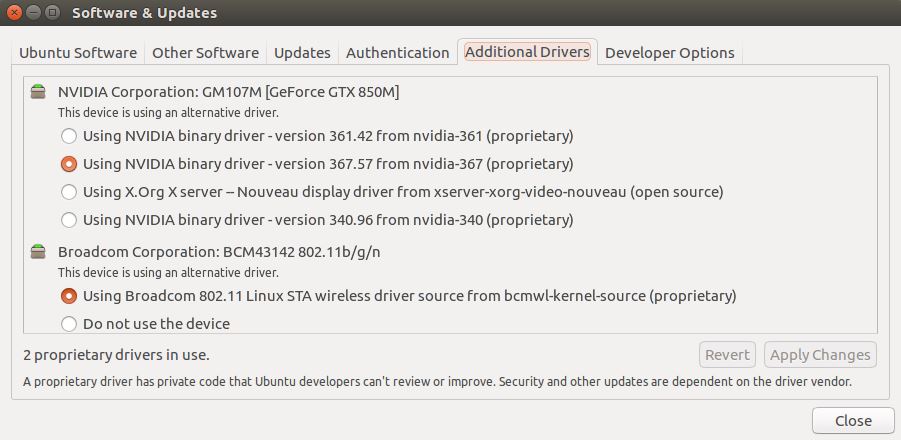
1、首先保证安装好NVIDIA驱动。如下图所示:
2、安装CUDA
sudo apt-get update
sudo apt-get install nvidia-cuda-toolkit
默认安装cuda 7.5.18 安装之后,是没有/usr/local/cuda*这个文件夹,也没有sample的
3、由于Ubuntu16.04的gcc和g++都是5.0版的,不兼容CUDA7.5版本,需要降级
sudo apt-get install gcc-4.9 g++-4.9
cd /usr/bin
sudo rm gcc
sudo rm g++
sudo ln -s gcc-4.9 gcc
sudo ln -s g++-4.9 g++
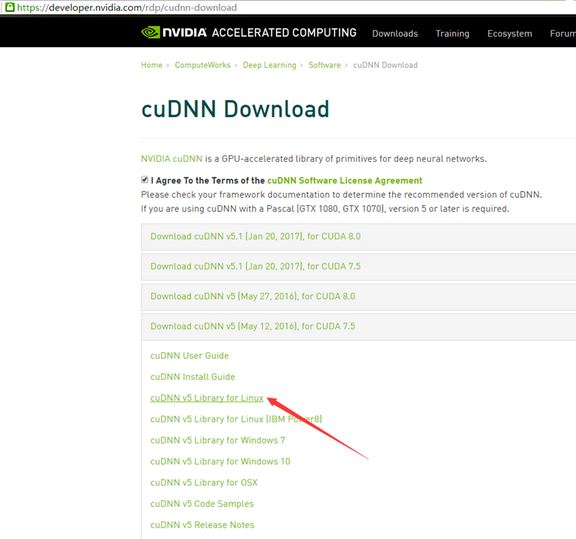
4、安装cudnn
下载cudnn 5.0 for cuda7.5 需要nvidia的开发者帐号登录
解压
tar -zxf cudnn-7.5-linux-x64-v5.0-ga.tgz
cd cuda
复制头文件到/usr/local/include
sudo cp include/cudnn.h /usr/local/include/
复制lib文件到/usr/local/lib
sudo cp lib64/* /usr/local/lib/
并编辑~/.bashrc 添加环境变量
export LD_LIBRARY_PATH=/usr/local/lib
5、安装theano
sudo apt-get install python-numpy python-scipy python-dev python-pip python-nose python-mock python-wheel g++ libopenblas-dev git
sudo pip install Theano
编辑配置文件
sudo gedit ~/.theanorc
加入
[global]
device = gpu
floatX = float32
[nvcc]
flags=-D_FORCE_INLINES
注意有符号-
测试,注意cuDNN版本5005

6、安装tensorflow
根据自己的实际情况参照官网的这张表选择适合的下载链接。
# Ubuntu/Linux 64-bit, CPU only, Python 2.7
export TF_BINARY_URL=https://storage.googleapis.com/tensorflow/linux/cpu/tensorflow-0.9.0-cp27-none-linux_x86_64.whl
# Ubuntu/Linux 64-bit, GPU enabled, Python 2.7
# Requires CUDA toolkit 7.5 and CuDNN v4. For other versions, see "Install from sources" below.
export TF_BINARY_URL=https://storage.googleapis.com/tensorflow/linux/gpu/tensorflow-0.9.0-cp27-none-linux_x86_64.whl
# Mac OS X, CPU only, Python 2.7:
export TF_BINARY_URL=https://storage.googleapis.com/tensorflow/mac/tensorflow-0.9.0-py2-none-any.whl
# Ubuntu/Linux 64-bit, CPU only, Python 3.4
export TF_BINARY_URL=https://storage.googleapis.com/tensorflow/linux/cpu/tensorflow-0.9.0-cp34-cp34m-linux_x86_64.whl
# Ubuntu/Linux 64-bit, GPU enabled, Python 3.4
# Requires CUDA toolkit 7.5 and CuDNN v4. For other versions, see "Install from sources" below.
export TF_BINARY_URL=https://storage.googleapis.com/tensorflow/linux/gpu/tensorflow-0.9.0-cp34-cp34m-linux_x86_64.whl
# Ubuntu/Linux 64-bit, CPU only, Python 3.5
export TF_BINARY_URL=https://storage.googleapis.com/tensorflow/linux/cpu/tensorflow-0.9.0-cp35-cp35m-linux_x86_64.whl
# Ubuntu/Linux 64-bit, GPU enabled, Python 3.5
# Requires CUDA toolkit 7.5 and CuDNN v4. For other versions, see "Install from sources" below.
export TF_BINARY_URL=https://storage.googleapis.com/tensorflow/linux/gpu/tensorflow-0.9.0-cp35-cp35m-linux_x86_64.whl
# Mac OS X, CPU only, Python 3.4 or 3.5:
export TF_BINARY_URL=https://storage.googleapis.com/tensorflow/mac/tensorflow-0.9.0-py3-none-any.whl
我在这里选择 64-bit GPU Python 2.7
export TF_BINARY_URL=https://storage.googleapis.com/tensorflow/linux/gpu/tensorflow-0.9.0-cp27-none-linux_x86_64.whl
然后根据自己情况选择
# Python 2
pip install --upgrade $TF_BINARY_URL
# Python 3
pip3 install --upgrade $TF_BINARY_URL
我在这里选择Python 2
pip install --upgrade $TF_BINARY_URL
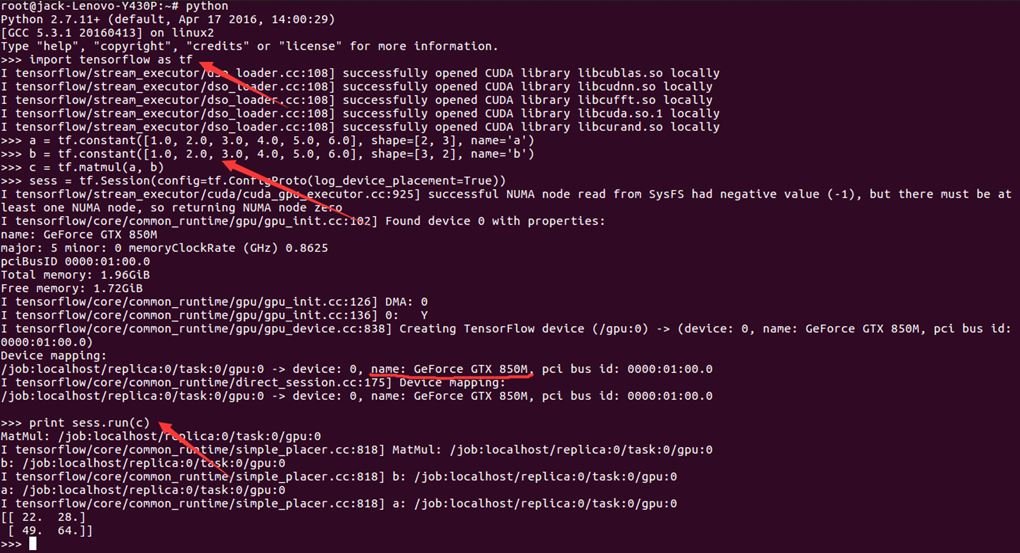
测试Tensorflow是否安装成功并使用了CUDA,依次执行以下python代码
import tensorflow as tf
a = tf.constant([1.0, 2.0, 3.0, 4.0, 5.0, 6.0], shape=[2, 3], name='a')
b = tf.constant([1.0, 2.0, 3.0, 4.0, 5.0, 6.0], shape=[3, 2], name='b')
c = tf.matmul(a, b)
sess = tf.Session(config=tf.ConfigProto(log_device_placement=True))
print sess.run(c)
实验结果如下,表示安装成功!可以开始新的征程啦。