
环境依赖
系统:ubuntu16.04.2
opencv3.2.0(Ubuntu下OpenCV的安装如果有疑问,参见我《Ubuntu16.04 OpenCV安装笔记》一文)
Dlib19.4(下载地址http://dlib.net/files/dlib-19.4.tar.bz2)
ubuntu下Dlib的安装参见它源码根目录下的“README.md”,介绍得比较详细,无非也就是Cmake->make->make install……,唯一一点就是要安装它的Python接口,安装完后,打开python,import dlib 没错就说明OK了。
caffe (相关配置步骤参见我《Ubuntu16.04 Caffe安装笔记》一文)
人脸关键点标定
在https://github.com/lsy17096535/face-landmark上下下来解决方案。
解决方法中model文件夹中存放原作者训练好的caffemodel,根目录下face_landmark.py是研读的重点。
在根目录下建立两个文件夹,images和results,用来存放检测图片和检测结果。
将face_landmark.py中的路径更改成自己的路径,而后将其复制到caffe/python文件夹中
在images文件夹下放入要标定的图片。在终端上运行face_landmark.py
sudo python caffe/python/face_landmark.py
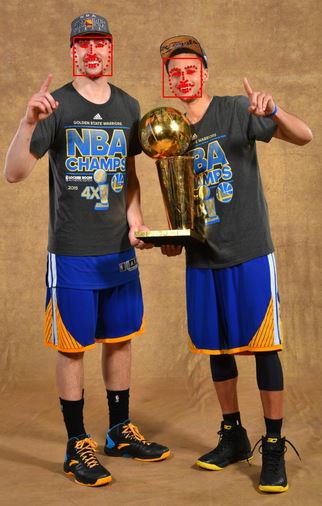
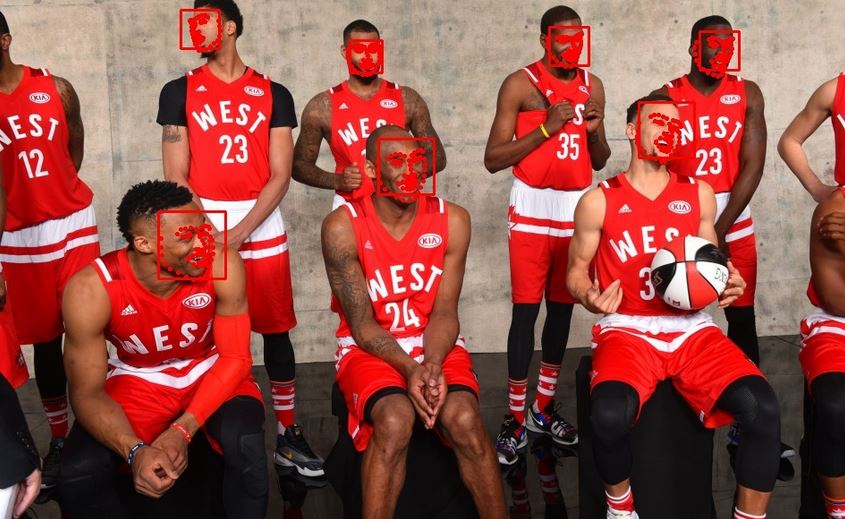
得到效果图如下:

代码分析
import sys
import os
import time
import pprint
import caffe
import dlib
import cv2
import numpy as np
def file_list_fn(path):
file_list = []
files = os.listdir(path)
for f in files:
file_list.append(f)
return file_list
net_work_path = '/home/yangyuan/project/face-landmark/model/landmark_deploy.prototxt'
weight_path = '/home/yangyuan/project/face-landmark/model/VanFace.caffemodel'
images_dir = '/home/yangyuan/project/face-landmark/images/'
result_dir = '/home/yangyuan/project/face-landmark/results/'
image_list = file_list_fn(images_dir)
caffe.set_mode_cpu()
net = caffe.Net(net_work_path, weight_path, caffe.TEST)
net.name = 'FaceThink_face_landmark_test'
detector = dlib.get_frontal_face_detector()
total_detecting_time = 0.0
total_landmark_time = 0.0
face_total = 0.0
for image in image_list:
print("Processing file: {}".format(image))
img = cv2.imread(images_dir + image)
# The 1 in the second argument indicates that we should upsample the image
# 1 time. This will make everything bigger and allow us to detect more
# faces.
det_start_time = time.time()
dets = detector(img, 1)
det_end_time = time.time()
det_time = det_end_time - det_start_time
total_detecting_time += det_time
print "Detecting time is {}".format(det_time)
print "Number of faces detected: {}".format(len(dets))
for i, d in enumerate(dets):
print "Detection {}: Left: {} Top: {} Right: {} Bottom: {}".format(
i, d.left(), d.top(), d.right(), d.bottom())
for index, det in enumerate(dets):
face_total += 1
x1 = det.left()
y1 = det.top()
x2 = det.right()
y2 = det.bottom()
if x1 < 0: x1 = 0
if y1 < 0: y1 = 0
if x2 > img.shape[1]: x2 = img.shape[1]
if y2 > img.shape[0]: y2 = img.shape[0]
cv2.rectangle(img, (x1, y1), (x2, y2), (0, 0, 255), 2)
roi = img[y1:y2 + 1, x1:x2 + 1, ]
gary_img = cv2.cvtColor(roi, cv2.COLOR_RGB2GRAY)
w = 60
h = 60
print image
res = cv2.resize(gary_img, (w, h), 0.0, 0.0, interpolation=cv2.INTER_CUBIC)
resize_mat = np.float32(res)
m = np.zeros((w, h))
sd = np.zeros((w, h))
mean, std_dev = cv2.meanStdDev(resize_mat, m, sd)
new_m = mean[0][0]
new_sd = std_dev[0][0]
new_img = (resize_mat - new_m) / (0.000001 + new_sd)
if new_img.shape[0] != net.blobs['data'].data[0].shape or new_img.shape[1] != net.blobs['data'].data[1].shape:
print "Incorrect " + image + ", resize to correct dimensions."
net.blobs['data'].data[...] = new_img
landmark_time_start = time.time()
out = net.forward()
landmark_time_end = time.time()
landmark_time = landmark_time_end - landmark_time_start
total_landmark_time += landmark_time
print "landmark time is {}".format(landmark_time)
points = net.blobs['Dense3'].data[0].flatten()
point_pair_l = len(points)
for i in range(point_pair_l / 2):
x = points[2*i] * (x2 - x1) + x1
y = points[2*i+1] * (y2 - y1) + y1
cv2.circle(img, (int(x), int(y)), 1, (0, 0, 255), 2)
cv2.imwrite(result_dir + image, img)
print total_detecting_time
print total_landmark_time
print face_total
per_face_det_time = total_detecting_time / face_total
per_face_landmark_time = total_landmark_time / face_total
per_image_det_time = total_detecting_time / len(image_list)
per_image_landmark_time = total_landmark_time / len(image_list)
print '~~~~~~~~~~~~~~~~~~~~~~~~~~~~~~~~~~~~~~~~~~~~'
print "per face detecting time is {}".format(per_face_det_time)
print "per face landmark time is {}".format(per_face_landmark_time)
print "per image detecting time is {}".format(per_image_det_time)
print "per image detecting time is {}".format(per_image_landmark_time)
detector = dlib.get_frontal_face_detector()建立人脸检测器(dlib训练好的),通过dets = detector(img, 1)调用来检测img中的人脸。其中1为upsample_num_times,即图片上采样的次数。dets中返回的是检测出来的人脸的框的信息。数据类型为dlib.rectangles,坐标信息用rectangles.left(),rectangles.top(),rectangles.right(),rectangles.bottom()来获取。
(放大图像或称为上采样(upsampling)或图像插值(interpolating)的主要目的是放大原图像。缩小图像或称为下采样(subsampled)或降采样(downsampled)的主要目的有两个:使得图像符合显示区域的大小和生成对应图像的缩略图)。
将dlib人脸检测器检测到的人脸图像输入神经网络模型前先要将其转换为灰度图,并resize到统一大小(60x60)。res = cv2.resize(gary_img, (w, h), 0.0, 0.0, interpolation=cv2.INTER_CUBIC),(w,h)为要resize成的大小,0.0,0.0为缩放比,这里由于指定了转换图像的大小,所以它俩就没用了。
mean, std_dev = cv2.meanStdDev(resize_mat, m, sd)为计算图片的平均灰度和灰度标准差(m, sd两参数是什么鬼?掩模?去掉也不影响结果)
new_img = (resize_mat - new_m) / (0.000001 + new_sd) 求图片每个像素和平均灰度的差再比上灰度标准差(加0.000001应该是为了防止除数为零 ),看来该神经网络模型是通过这个特征提取办法得到的数据来训练的,并不是通过原始的图片作为训练数据集,怪不得处理速度那么快。