
前言
此篇文章将详细记录如何使用Eclipse C++运行并调试SSD代码,针对的是ssd_detect.cpp这个C++检测代码,而非SSD(caffe)框架本身。
一个现实问题是,在caffe文件夹下,调试cpp代码显得很困难,每次都要重新编译整个caffe,如想方便地调试和改写代码,其中简便的办法就是使用IDE。因此,对于大型C++工程而言,十分需要把SSD(caffe)作为一个可调用的库,通过写自己的cpp程序来调用caffe的接口函数,实现一整套的检测流程。
看了不少关于caffe for eclipse的文章,感觉都没有把整个过程说明白,有些教程甚至是错误的,于是决定成功实现后,自己动手写一篇。本教程适用于原版caffe和衍生的SSD项目,核心内容是如何在eclipse C++上配置SSD所需的caffe环境,以调用caffe C++接口。
安装编译SSD框架
首先需要成功编译SSD源代码
git clone https://github.com/weiliu89/caffe.git
cd caffe
git checkout ssd
cp Makefile.config.example Makefile.config
# 注意修改Makefile和makefile.config文件
make -j8
make distribute # 正常使用无需,本次试验必须
make pycaffe # 可选
下载安装Eclipse for C++
首先需要正确安装eclipse for C++,一般而言,不推荐使用apt-get的形式安装(会安装很多不必要的文件),我们去官网下载Eclipse IDE for C/C++ Developers(http://www.eclipse.org/downloads/packages/eclipse-ide-cc-developers/neon2),选择64位的压缩包,解压后将得到的eclipse文件夹放在常用目录下,我是放在了/home目录下。
运行软件之前需要安装openjdk,因为eclipse是基于Java语言的IDE,必须有java运行环境的支持,可以终端输入java -version 来查看,如确实未安装的话,可通过如下命令安装:
# 不开发java软件,就只需要java运行环境(Java Runtime Environment)
sudo apt-get install openjdk-8-jre
然后运行软件./eclipse/eclipse ,现在就可以打开eclipse。
安装OpenCV-2.4.9
下载并编译源码
ssd_detect.cpp的代码中用到了OpenCV作为图像处理的库,由于博主caffe编译中所使用的opencv是通过apt-get的形式安装的,其安装位置不在/usr/local中,故而eclipse这种IDE是无法正常调用的。所以我们必须下载opencv源码进行安装。
这里吐槽下,查到的那些Ubuntu系统安装opencv的教程都坑的不行,经过反复试验,才终于找到了正确安装方法。
首先下载opencv源代码,版本没那么重要,但必须是opencv2的,这里选择了最多使用的opencv-2.4.9,下载压缩包,解压到常用文件夹,这里我的路径是~/tempfile文件夹中。
# 首先安装opencv所需依赖包
sudo apt-get install build-essential libgtk2.0-dev libavcodec-dev libavformat-dev libjpeg62-dev libtiff5 libtiff5-dev cmake cmake-gui libswscale-dev libjasper-dev
cd ~/tempfile/opencv-2.4.9
mkdir build
cd build
cmake-gui
说明一下 ,许多教程包括opencv官网教程,都使用的是cmake直接配置,但是这样做,后面的make过程中往往会报错。因此我们使用cmake-gui工具进行配置,运行语句,出现如下的界面。
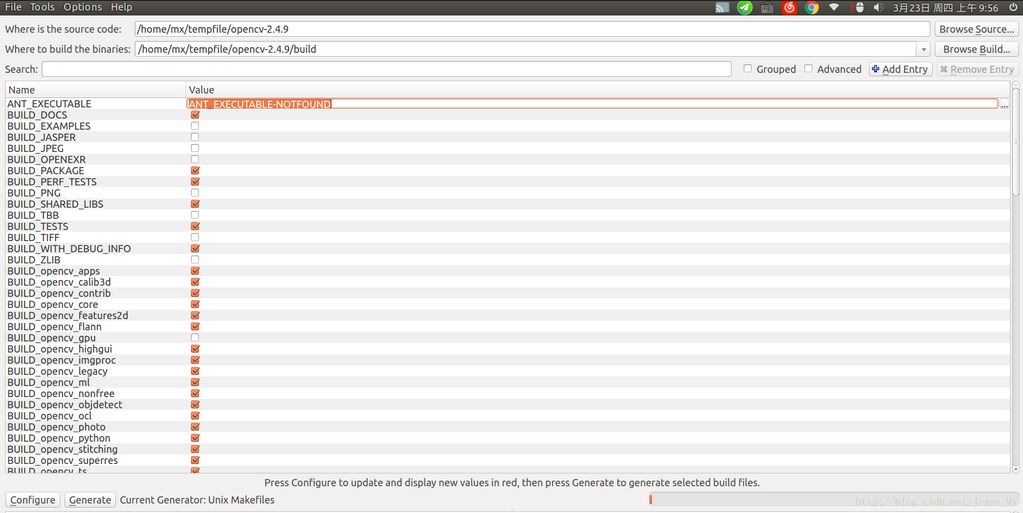
按照上图格式填写路径,然后点击Configure ,就会出现很多编译选项,重点来了,把WITH_CUDA和BUILD_opencv_gpu 这两个选项去掉,原因是用不到以及编译过程中会疯狂报错。然后点击Generate,再使用make命令编译安装,可以确保成功。
make -j8
sudo make install
默认安装位置就是/usr/local,不要修改。成功安装后,opencv的源文件和链接库文件分别存放在/usr/local/include 以及/usr/local/lib 之中。
配置OpenCV环境变量
这一步不是必须的,建议先使用程序测试openCV是否能使用,如果能用,貌似不加环境变量也行。
cd ~
gedit .profile # 打开文件
export PKG_CONFIG_PATH=$PKG_CONFIG_PATH:/usr/local/lib/pkgconfig # 文件最后添加此句
# 保存并退出文件
source /etc/profile # 使环境变量生效
sudo gedit /etc/ld.so.conf.d/opencv.conf # 打开并新建文件
/usr/local/lib # 空白文件内加入此句
# 保存并退出文件
sudo ldconfig # 使opecv的lib路径生效
经过上述流程,就可以在eclipse中使用opencv了,当然,仍需配置相应的include路径和lib文件。
安装glog,gflags,boost库
有朋友可能要问了,既然caffe都编译通过了,说明这三个库已经安装,为什么还要再重新单独安装呢?原因和上面的opencv类似,在测试中,使用apt-get安装的这三个库在eclipse中无法调用,编译文件报错,如下图所示,这决定了我必须单独安装这三个库。

当然。如果你能正确识别相关函数,也可以不用安装;否则,请按照以下说明进行源码安装,默认安装位置都是/usr/local。
安装glog
glog是Google发布的一个开源日志库,在caffe中主要起到记录日志的作用,以便开发者查看caffe运行的中间输出结果。我们下载glog-0.3.3.tar.gz 版本,解压到常用文件夹,然后进行安装。
cd ~/tempfile/glog-0.3.3
./configure
make -j8
sudo make install
安装gflags
gflags是Google发布的命令行参数工具,在caffe中主要作用是解析命令行参数,和protobuffer功能类似。我们下载gflags 2.2.0 版本,经测试2.1.1的版本make过程中出错,2.2.0则正常,解压到常用文件夹,然后安装。
cd ~/tempfile/gflags-2.2.0
mkdir build
cd build
cmake ..
ccmake ..
执行ccmake .. 命令后,会出现ccmake配置界面,如下图所示。
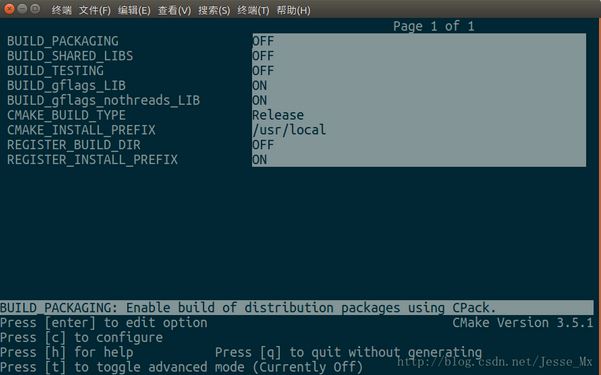
这里,将BUILD_SHARE_LIB 选项设为ON ,也有说倒数第二项也要设为ON,但我没设。然后按c键,出现文字界面后按e键返回,然后再按g键生成Makefile,继续安装。
make -j8
sudo make install
安装boost
boost也是一个很大的C++运行库,在caffe中主要使用了boost中的智能指针,pycaffe也用到了boost Python,方便python调用C++模块。我们下载boost_1_58_0.tar.bz2版本,解压后进行安装。
cd ~/tempfile/boost_1_58_0
# 只安装caffe需要的3个组件,全部安装十分耗时,还可能报错
./boostrap.sh --with-libraries=system,thread,python
./b2
sudo ./b2 install
新建Eclipse C++工程
完成以上步骤,我们就可以新建工程来运行和调试cpp代码了。
新建工程
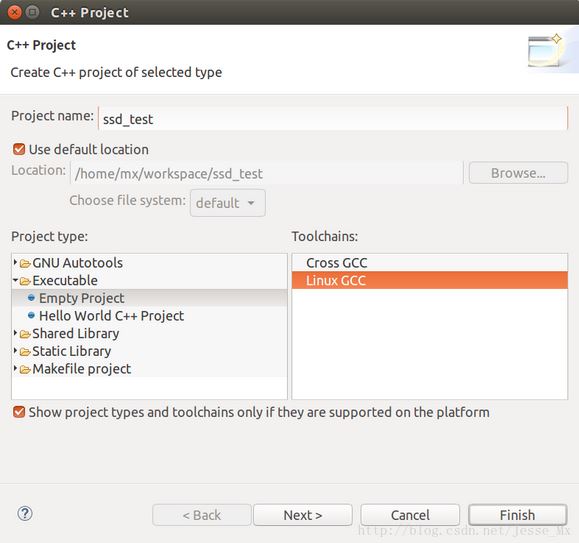
启动eclipse,新建一个C++ project:File ->New ->C++ Project,选择建立一个空的Linux GCC工程并命名,如下图:
添加源文件:File ->New ->Source File
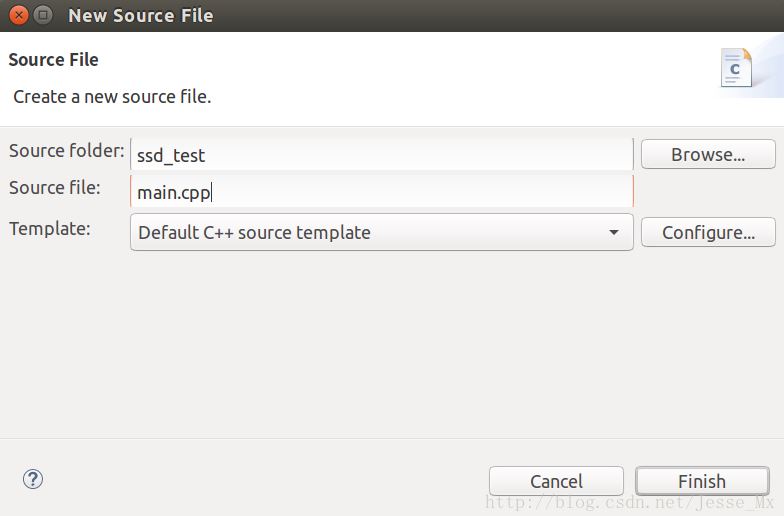
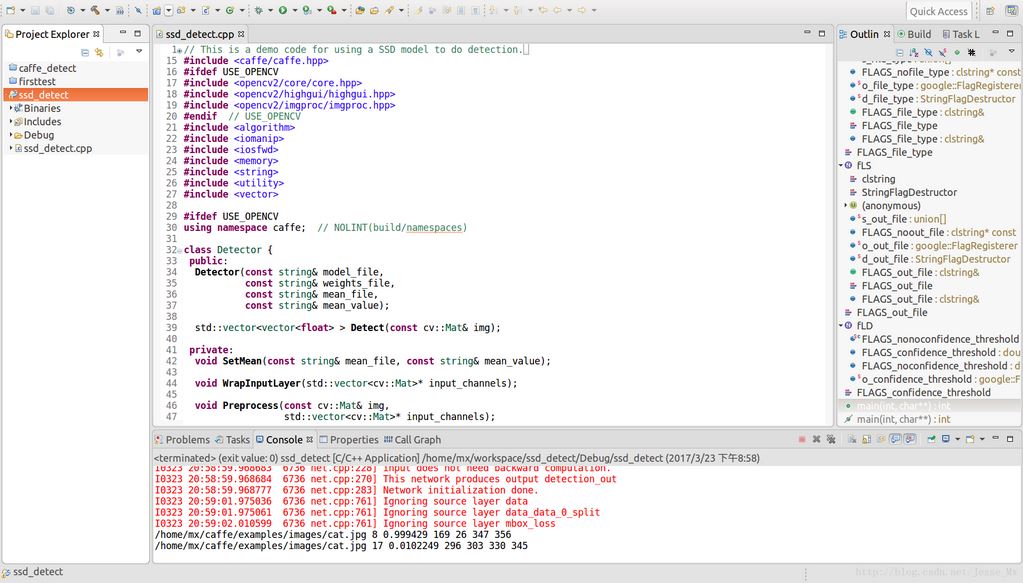
复制~/caffe/examples/ssd/ssd_detect.cpp的所有内容到新建的main.cpp文件中。
#include <caffe/caffe.hpp>
#ifdef USE_OPENCV
#include <opencv2/core/core.hpp>
#include <opencv2/highgui/highgui.hpp>
#include <opencv2/imgproc/imgproc.hpp>
#endif // USE_OPENCV
#include <algorithm>
#include <iomanip>
#include <iosfwd>
#include <memory>
#include <string>
#include <utility>
#include <vector>
#ifdef USE_OPENCV
using namespace caffe; // NOLINT(build/namespaces)
class Detector {
public:
Detector(const string& model_file,
const string& weights_file,
const string& mean_file,
const string& mean_value);
std::vector<vector<float> > Detect(const cv::Mat& img);
private:
void SetMean(const string& mean_file, const string& mean_value);
void WrapInputLayer(std::vector<cv::Mat>* input_channels);
void Preprocess(const cv::Mat& img,
std::vector<cv::Mat>* input_channels);
private:
shared_ptr<Net<float> > net_;
cv::Size input_geometry_;
int num_channels_;
cv::Mat mean_;
};
Detector::Detector(const string& model_file,
const string& weights_file,
const string& mean_file,
const string& mean_value) {
#ifdef CPU_ONLY
Caffe::set_mode(Caffe::CPU);
#else
Caffe::set_mode(Caffe::GPU);
#endif
/* Load the network. */
net_.reset(new Net<float>(model_file, TEST));
net_->CopyTrainedLayersFrom(weights_file);
CHECK_EQ(net_->num_inputs(), 1) << "Network should have exactly one input.";
CHECK_EQ(net_->num_outputs(), 1) << "Network should have exactly one output.";
Blob<float>* input_layer = net_->input_blobs()[0];
num_channels_ = input_layer->channels();
CHECK(num_channels_ == 3 || num_channels_ == 1)
<< "Input layer should have 1 or 3 channels.";
input_geometry_ = cv::Size(input_layer->width(), input_layer->height());
/* Load the binaryproto mean file. */
SetMean(mean_file, mean_value);
}
std::vector<vector<float> > Detector::Detect(const cv::Mat& img) {
Blob<float>* input_layer = net_->input_blobs()[0];
input_layer->Reshape(1, num_channels_,
input_geometry_.height, input_geometry_.width);
/* Forward dimension change to all layers. */
net_->Reshape();
std::vector<cv::Mat> input_channels;
WrapInputLayer(&input_channels);
Preprocess(img, &input_channels);
net_->Forward();
/* Copy the output layer to a std::vector */
Blob<float>* result_blob = net_->output_blobs()[0];
const float* result = result_blob->cpu_data();
const int num_det = result_blob->height();
vector<vector<float> > detections;
for (int k = 0; k < num_det; ++k) {
if (result[0] == -1) {
// Skip invalid detection.
result += 7;
continue;
}
vector<float> detection(result, result + 7);
detections.push_back(detection);
result += 7;
}
return detections;
}
/* Load the mean file in binaryproto format. */
void Detector::SetMean(const string& mean_file, const string& mean_value) {
cv::Scalar channel_mean;
if (!mean_file.empty()) {
CHECK(mean_value.empty()) <<
"Cannot specify mean_file and mean_value at the same time";
BlobProto blob_proto;
ReadProtoFromBinaryFileOrDie(mean_file.c_str(), &blob_proto);
/* Convert from BlobProto to Blob<float> */
Blob<float> mean_blob;
mean_blob.FromProto(blob_proto);
CHECK_EQ(mean_blob.channels(), num_channels_)
<< "Number of channels of mean file doesn't match input layer.";
/* The format of the mean file is planar 32-bit float BGR or grayscale. */
std::vector<cv::Mat> channels;
float* data = mean_blob.mutable_cpu_data();
for (int i = 0; i < num_channels_; ++i) {
/* Extract an individual channel. */
cv::Mat channel(mean_blob.height(), mean_blob.width(), CV_32FC1, data);
channels.push_back(channel);
data += mean_blob.height() * mean_blob.width();
}
/* Merge the separate channels into a single image. */
cv::Mat mean;
cv::merge(channels, mean);
/* Compute the global mean pixel value and create a mean image
* filled with this value. */
channel_mean = cv::mean(mean);
mean_ = cv::Mat(input_geometry_, mean.type(), channel_mean);
}
if (!mean_value.empty()) {
CHECK(mean_file.empty()) <<
"Cannot specify mean_file and mean_value at the same time";
stringstream ss(mean_value);
vector<float> values;
string item;
while (getline(ss, item, ',')) {
float value = std::atof(item.c_str());
values.push_back(value);
}
CHECK(values.size() == 1 || values.size() == num_channels_) <<
"Specify either 1 mean_value or as many as channels: " << num_channels_;
std::vector<cv::Mat> channels;
for (int i = 0; i < num_channels_; ++i) {
/* Extract an individual channel. */
cv::Mat channel(input_geometry_.height, input_geometry_.width, CV_32FC1,
cv::Scalar(values[i]));
channels.push_back(channel);
}
cv::merge(channels, mean_);
}
}
/* Wrap the input layer of the network in separate cv::Mat objects
* (one per channel). This way we save one memcpy operation and we
* don't need to rely on cudaMemcpy2D. The last preprocessing
* operation will write the separate channels directly to the input
* layer. */
void Detector::WrapInputLayer(std::vector<cv::Mat>* input_channels) {
Blob<float>* input_layer = net_->input_blobs()[0];
int width = input_layer->width();
int height = input_layer->height();
float* input_data = input_layer->mutable_cpu_data();
for (int i = 0; i < input_layer->channels(); ++i) {
cv::Mat channel(height, width, CV_32FC1, input_data);
input_channels->push_back(channel);
input_data += width * height;
}
}
void Detector::Preprocess(const cv::Mat& img,
std::vector<cv::Mat>* input_channels) {
/* Convert the input image to the input image format of the network. */
cv::Mat sample;
if (img.channels() == 3 && num_channels_ == 1)
cv::cvtColor(img, sample, cv::COLOR_BGR2GRAY);
else if (img.channels() == 4 && num_channels_ == 1)
cv::cvtColor(img, sample, cv::COLOR_BGRA2GRAY);
else if (img.channels() == 4 && num_channels_ == 3)
cv::cvtColor(img, sample, cv::COLOR_BGRA2BGR);
else if (img.channels() == 1 && num_channels_ == 3)
cv::cvtColor(img, sample, cv::COLOR_GRAY2BGR);
else
sample = img;
cv::Mat sample_resized;
if (sample.size() != input_geometry_)
cv::resize(sample, sample_resized, input_geometry_);
else
sample_resized = sample;
cv::Mat sample_float;
if (num_channels_ == 3)
sample_resized.convertTo(sample_float, CV_32FC3);
else
sample_resized.convertTo(sample_float, CV_32FC1);
cv::Mat sample_normalized;
cv::subtract(sample_float, mean_, sample_normalized);
/* This operation will write the separate BGR planes directly to the
* input layer of the network because it is wrapped by the cv::Mat
* objects in input_channels. */
cv::split(sample_normalized, *input_channels);
CHECK(reinterpret_cast<float*>(input_channels->at(0).data)
== net_->input_blobs()[0]->cpu_data())
<< "Input channels are not wrapping the input layer of the network.";
}
DEFINE_string(mean_file, "",
"The mean file used to subtract from the input image.");
DEFINE_string(mean_value, "104,117,123",
"If specified, can be one value or can be same as image channels"
" - would subtract from the corresponding channel). Separated by ','."
"Either mean_file or mean_value should be provided, not both.");
DEFINE_string(file_type, "image",
"The file type in the list_file. Currently support image and video.");
DEFINE_string(out_file, "",
"If provided, store the detection results in the out_file.");
DEFINE_double(confidence_threshold, 0.01,
"Only store detections with score higher than the threshold.");
int main(int argc, char** argv) {
::google::InitGoogleLogging(argv[0]);
// Print output to stderr (while still logging)
FLAGS_alsologtostderr = 1;
#ifndef GFLAGS_GFLAGS_H_
namespace gflags = google;
#endif
gflags::SetUsageMessage("Do detection using SSD mode.\n"
"Usage:\n"
" ssd_detect [FLAGS] model_file weights_file list_file\n");
gflags::ParseCommandLineFlags(&argc, &argv, true);
if (argc < 4) {
gflags::ShowUsageWithFlagsRestrict(argv[0], "examples/ssd/ssd_detect");
return 1;
}
const string& model_file = argv[1];
const string& weights_file = argv[2];
const string& mean_file = FLAGS_mean_file;
const string& mean_value = FLAGS_mean_value;
const string& file_type = FLAGS_file_type;
const string& out_file = FLAGS_out_file;
const float confidence_threshold = FLAGS_confidence_threshold;
// Initialize the network.
Detector detector(model_file, weights_file, mean_file, mean_value);
// Set the output mode.
std::streambuf* buf = std::cout.rdbuf();
std::ofstream outfile;
if (!out_file.empty()) {
outfile.open(out_file.c_str());
if (outfile.good()) {
buf = outfile.rdbuf();
}
}
std::ostream out(buf);
// Process image one by one.
std::ifstream infile(argv[3]);
std::string file;
while (infile >> file) {
if (file_type == "image") {
cv::Mat img = cv::imread(file, -1);
CHECK(!img.empty()) << "Unable to decode image " << file;
std::vector<vector<float> > detections = detector.Detect(img);
/* Print the detection results. */
for (int i = 0; i < detections.size(); ++i) {
const vector<float>& d = detections[i];
// Detection format: [image_id, label, score, xmin, ymin, xmax, ymax].
CHECK_EQ(d.size(), 7);
const float score = d[2];
if (score >= confidence_threshold) {
out << file << " ";
out << static_cast<int>(d[1]) << " ";
out << score << " ";
out << static_cast<int>(d[3] * img.cols) << " ";
out << static_cast<int>(d[4] * img.rows) << " ";
out << static_cast<int>(d[5] * img.cols) << " ";
out << static_cast<int>(d[6] * img.rows) << std::endl;
}
}
} else if (file_type == "video") {
cv::VideoCapture cap(file);
if (!cap.isOpened()) {
LOG(FATAL) << "Failed to open video: " << file;
}
cv::Mat img;
int frame_count = 0;
while (true) {
bool success = cap.read(img);
if (!success) {
LOG(INFO) << "Process " << frame_count << " frames from " << file;
break;
}
CHECK(!img.empty()) << "Error when read frame";
std::vector<vector<float> > detections = detector.Detect(img);
/* Print the detection results. */
for (int i = 0; i < detections.size(); ++i) {
const vector<float>& d = detections[i];
// Detection format: [image_id, label, score, xmin, ymin, xmax, ymax].
CHECK_EQ(d.size(), 7);
const float score = d[2];
if (score >= confidence_threshold) {
out << file << "_";
out << std::setfill('0') << std::setw(6) << frame_count << " ";
out << static_cast<int>(d[1]) << " ";
out << score << " ";
out << static_cast<int>(d[3] * img.cols) << " ";
out << static_cast<int>(d[4] * img.rows) << " ";
out << static_cast<int>(d[5] * img.cols) << " ";
out << static_cast<int>(d[6] * img.rows) << std::endl;
}
}
++frame_count;
}
if (cap.isOpened()) {
cap.release();
}
} else {
LOG(FATAL) << "Unknown file_type: " << file_type;
}
}
return 0;
}
#else
int main(int argc, char** argv) {
LOG(FATAL) << "This example requires OpenCV; compile with USE_OPENCV.";
}
#endif // USE_OPENCV
配置C/C++环境变量
这一步很关键,缺少环境变量的话,eclipse无法识别C/C++函数,就连基本的cin和cout都会报错。
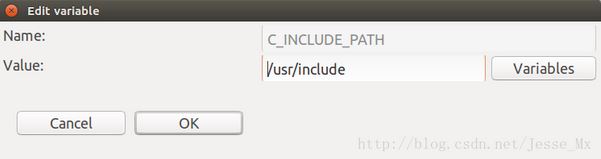
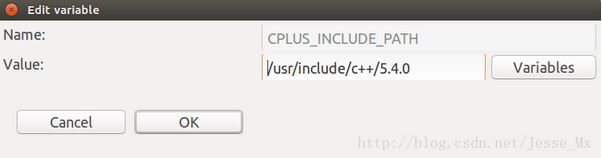
Windows->Preference->C/C++->Build->Enviroment ,添加两条环境变量:
C_INCLUDE_PATH=/usr/include
CPLUS_INCLUDE_PATH=/usr/include/c++/5.4.0
加载头文件
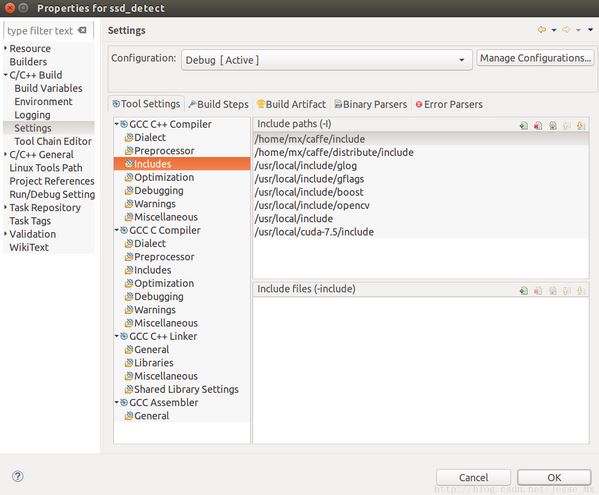
定位到:Project -> Properties ->C/C++ Build -> Settings ->GCC C++ Compiler -> Includes,然后在Include paths(-I)中添加如下路径。
/home/mx/caffe/include
/home/mx/caffe/distribute/include
/usr/local/cuda-7.5/include
/usr/local/include
/usr/local/include/opencv
/usr/local/include/boost
/usr/local/include/glog
/usr/local/include/gflags
效果如下图所示:
加载库文件
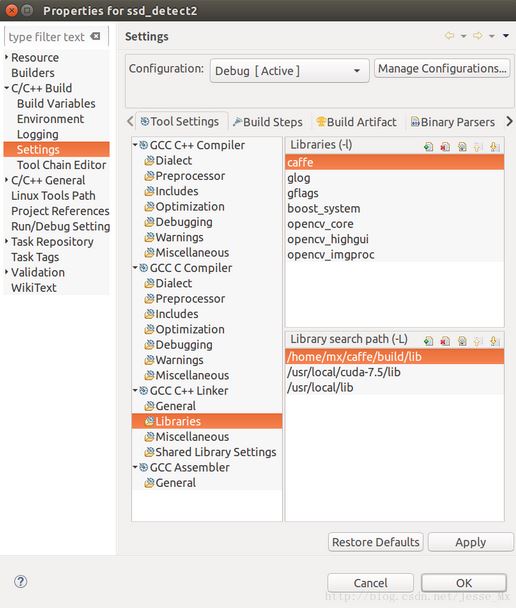
首先定位到:Project -> Properties ->C/C++ Build -> Settings ->GCC C++ Linker -> Libraries,在Libraries(-I)中添加所需的库,至于opencv,我只加载了程序引用的的3个库。
caffe
opencv_core
opencv_highgui
opencv_imgproc
glog
gflags
boost_system
在Library search path(-I)中添加库路径。
/home/mx/caffe/build/lib # caffe库路径
/usr/local/cuda-7.5/lib # cuda库路径
/usr/local/lib # opencv,boost,glog,gflags库路径
效果如下图所示:
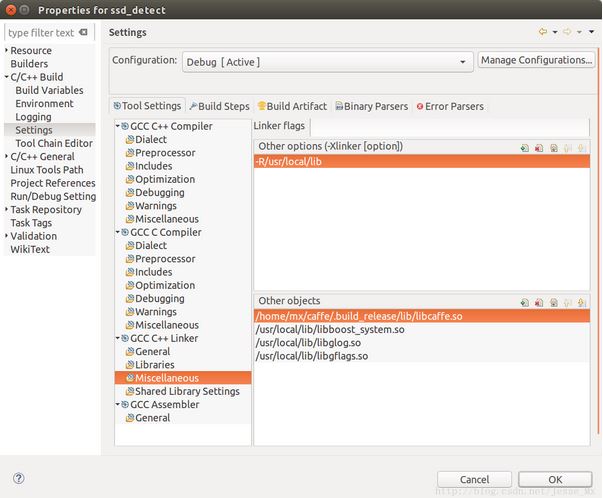
然后定位到:Project -> Properties ->C/C++ Build -> Settings ->GCC C++ Linker -> Miscellaneous,在Other Objects中添加程序所需的共享对象库。
/home/mx/caffe/.build_release/lib/libcaffe.so
/usr/local/lib/libboost_system.so
/usr/local/lib/libglog.so
/usr/local/lib/libgflags.so
然后在Other options中添加如下语句.
-R/usr/local/lib
效果如下图所示:
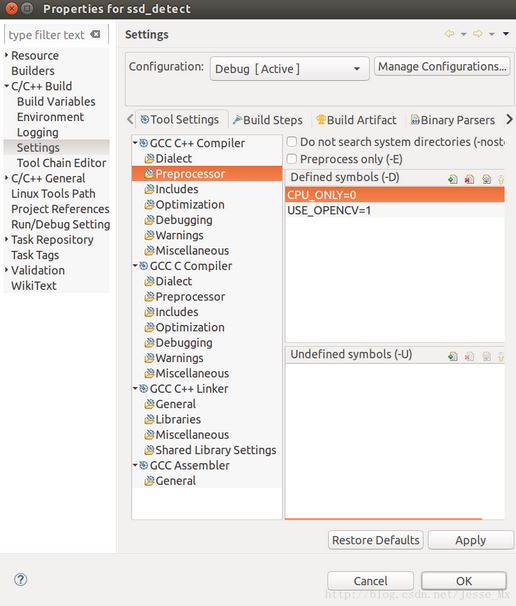
设置标志位参数
ssd_detect.cpp中定义了两个宏,分别控制是否使用opencv和是否使用cpu模式,这里我的选择是要使用opencv,不使用cpu模式(使用gpu)。那么定位到:Project -> Properties ->C/C++ Build -> Settings ->GCC C++ Compiler -> Preprocessor ,在Define symbols(-D)中添加标志位。
CPU_ONLY=0 # 感觉多余,我没添加,仍然为GPU模式
USE_OPENCV=1 # 这条必要
运行程序
添加完头文件和库文件,就可以开始编译程序了:Project->Build Project,如果一切顺利,编译过程不会报错,最多有几个warning;如果有错,可以参看后文的常见错误总结。
编译成功,就可以运行程序了,由于此程序使用了argc和argv作为参数传递的入口,因此我们需要在eclipse中添加所需argv参数。在工程栏点击右键,定位到:Run as->Run Configurations,接着弹出菜单,在C/C++ Application->Auguments中添加3条语句,分别作为argv[1][2][3](argv[0]是程序名,自动添加),如下图所示。
/home/mx/caffe/models/VGGNet/VOC0712/SSD_300x300/deploy.prototxt # argv[1]
/home/mx/caffe/models/VGGNet/VOC0712/SSD_300x300/VGG_VOC0712_SSD_300x300_iter_120000.caffemodel # argv[2]
/home/mx/caffe/examples/images/list.txt # argv[3]
提示:list.txt文件每一行都是待检测图片的路径,比如/home/mx/caffe/examples/images/cat.jpg
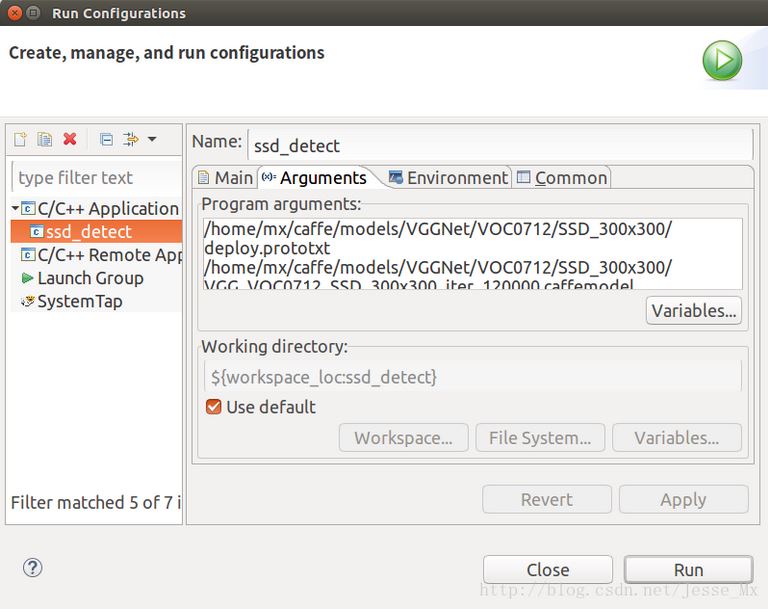
添加参数后,点击Apply,接着点击Run,程序就可以运行了,运行结果如下图。
至此,eclipse的caffe配置已经全部完成了,后面就可以根据此配置,进行单步调试,修改代码等等操作了。
常见错误总结
最后的最后,总结了网上和自己配置中常见的各种错误,以供参考,如出现新的错误类型也会跟新在文章中。
Error1:/usr/include/boost/system/error_code.hpp:222:‘boost::system::generic_category()' 未定义的引用
错误原因,没有在/usr/local安装boost库,请参考本文进行安装,并添加相应路径。
Error2: 'cublas_v2.h: No such file or directory'
错误原因,没有添加cuda的头文件和库文件,添加了就不会报错。
Error3:**undefined reference to symbol '_ZN6google4base21CheckOpMessageBuilder7ForVar2Ev'
错误原因,程序找不到glog和gflags库,所以应该安装这两个库,并添加其路径。
Error4:/usr/lib/x86_64-linux-gnu/libglog.so.0: error adding symbols:DSO misssing from command line
错误原因,没有添加正确的glog共享对象库,应该在Miscellaneous->Other Objects中添加/usr/local/lib/libglog.so,同时Libraries(-I)中添加glog。
Error5:error while loading shared libraries :libcaffe.so.10.0-rc3:cannot open share
错误原因,缺失libcaffe.so.1.0.0-rc3库或者没有设置共享库路径,如果caffe中存在这个库,那么可以这样做:
cd /etc/ld.so.conf.d
sudo gedit caffe.conf
# 打开的的conf文件加入/home/mx/caffe/.build_release/lib,保存退出
sudo ldconfig
忙活半天,事后发现eclipse配置caffe环境的步骤真是繁琐,而使用qtcreator进行配置则要简单得多,悔不该早日发现qt这一神器,感觉身体被掏空。