
一,gearman的安装
1.1.gearman工作原理
Gearman 服务有很多要素使得它不仅仅是一种提交和共享工作的方式,
但是主要的系统只由三个组件组成:
gearmand 守护进程(server),
用于向 Gearman 服务提交请求的 client ,
执行实际工作的 worker。
其关系如下图所示:
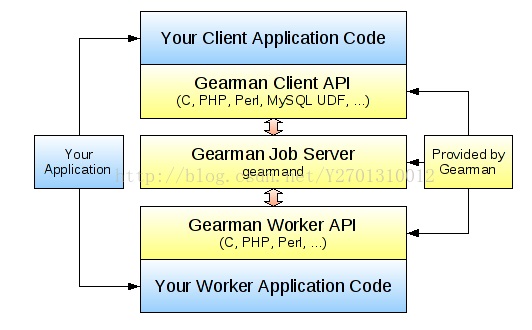
Fig 1. gearm工作原理
Gearmand server执行一个简单的功能,
即从client收集job请求并充当一个注册器,
而worker可以在此提交关于它们支持的job和操作类型的信息,
这样server实际上就充当了Client和Worker的中间角色。
Client将job直接丢给server,而server根据worker提交的信息,将这些job分发给worker来做,
worker完成后也可返回结果,server将结果传回client。
举个例子,
在一个公司里面,有老板1、老板2、老板3(client),
他们的任务就是出去喝酒唱歌拉项目(job),将拉来的项目直接交给公司的主管(server),
而主管并不亲自来做这些项目,他将这些项目分给收手下的员工(worker)来做,
员工做完工作后,将结果交给主管,主管将结果报告给老板们即可。
1.2. gearman 的下载与安装
它的下载与安装分两部分:
Job Server(gearmand);
和 Client & Worker APIs
而这每个部分又提供了很多种语言的实现,
Job Server的实现有C,Java, Perl三种;
Client&Worker API的实现语言更多,包括有C, shell, Perl, Nodejs, PHP,Python, Java, C#/.NET, GO, Lisp;
它还有数据库的接口,支持的种类有: MySQL, PostgreSQL, Drizzle等
另外,官网还介绍了一些可选配的工具,包括有:
. Gearman-Monitor(PHP)
使用PHP开发服务器监视工具,用来监测服务器的状态
Gearman-Monitor on GitHub (https://github.com/yugene/Gearman-Monitor)
. GearmanManager(PHP)
用来管理多个gearman woker的框架
GearmanManager On GitHub(https://github.com/brianlmoon/GearmanManager)
. Multi-process Gearman Task Server Library(Python)
GMTasks contains a simple multiprocessing server for Gearman workers,
designed for ease of configuration and maximum availability.
GMTasks(https://github.com/ex-nerd/gmtasks)
本文使用的是C语言版的Job Server和Python版的 Client&Worker API;
1.2.1.安装server
要使用gearman,首先得安装server,下载地址:
http://gearman.org/download/。
下载源码:
https://github.com/gearman/gearmand/releases
$ tar -zxvf gearmand-1.1.14
$ cd gearmand-1.1.14
$ ./configure
$ make
$ sudo make install
配置时,可能会报缺库,需要自己手动安装
1).libevent库的安装:
下载:
$ wget https://github.com/libevent/libevent/releases/download/release-2.0.22-stable/libevent-2.0.22-stable.tar.gz
在当前目录下解压安装包:
$ tar -zxvf libevent-2.0.22-stable.tzr.gz
$ cd libevent-2.0.22-stable
配置安装库的目标路径:
$ ./configure
编译安装libevent库:
$ make
$ sudo make install
2).libuuid的安装
$ sudo apt-get install uuid-dev
3).boostlib的安装
$ sudo apt-get install uuid-dev libevent-dev libboost-all-dev libdrizzle-dev
当安装完成后,可以启动
gearmand,
启动有很多参数选项,可以man gearmand来查看,主要的选项有:
-b, --backlog=BACKLOG Number of backlog connections for listen.
-d, --daemon Daemon, detach and run in the background.
-f, --file-descriptors=FDS Number of file descriptors to allow for the process
(total connections will be slightly less). Default is max allowed for user.
-h, --help Print this help menu.
-j, --job-retries=RETRIES Number of attempts to run the job before the job server removes it.
This is helpful to ensure a bad job does not crash all available workers.
Default is no limit.
-l, --log-file=FILE 日志输出文件;Log file to write errors and information to.
Turning this option on also forces the first verbose level to be enabled.
-L, --listen=ADDRESS Address the server should listen on. Default is INADDR_ANY.
-p, --port=PORT Port the server should listen on.
-P, --pid-file=FILE 以进程号为标识的文件写出;File to write process ID out to.
-r, --protocol=PROTOCOL Load protocol module.
-R, --round-robin Assign work in round-robin order per workerconnection.
The default is to assign work in the order of functions added by the worker.
-q, --queue-type=QUEUE Persistent queue type to use.
-t, --threads=THREADS Number of I/O threads to use. Default=0.
-u, --user=USER Switch to given user after startup.
-v, --verbose Increase verbosity level by one.
-V, --version Display the version of gearmand and exit.
-w, --worker-wakeup=WORKERS Number of workers to wakeup for each job received.
The default is to wakeup all available workers.
启动gearmand:
sudo gearmand --pid-file=/var/run/gearmand/gearmand.pid --daemon --log-file=/var/log/gearman.log
若提示没有/var/log/gearman.log这个文件的话,自己新建一个就可以了。
1.2.2.Client & Worker API
gearman提供了两种不同的Python API, 一个是 libgearman C库的封装,另一个则是纯粹的Python API.
纯Python的安装:
A pure-Python API that can be found on PyPI as “gearman”, and can be installed with “easy_install gearman”.
$ easy_install gearman
或
$ pip install gearman
C库的Python封装的安装:
. python-gearman(http://pypi.python.org/pypi/gearman/)
二,应用示例
2.1.单机版消息通信示例
###########################
worker.py
###########################
#!/usr/bin/env python2.7
# -*- coding:utf-8 -*-
#
import os
import gearman
import math
class CustomGearmanWorker(gearman.GearmanWorker):
def on_job_execute(self, current_job):
print "Job started"
return super(CustomGearmanWorker, self).on_job_execute(current_job)
def task_callback(gearman_worker, job):
print job.data
return job.data
if __name__ == '__main__':
new_worker = CustomGearmanWorker(['localhost:4730'])
new_worker.register_task("echo", task_callback)
new_worker.work()
###########################
client.py
###########################
#!/usr/bin/env python2.7
# -*- coding:utf-8 -*-
#
from gearman import GearmanClient
new_client = GearmanClient(['localhost:4730'])
current_request = new_client.submit_job('echo', 'foo')
new_result = current_request.result
print new_result
运行gearman server:
$ gearmand --daemon --listen=127.0.0.1
启动worker程序:python worker.py
启动client程序:python client.py
2.2.多机版消息通信示例
###########################
worker.py
###########################
#!/usr/bin/env python2.7
# -*- coding:utf-8 -*-
#
import os
import gearman
import math
class CustomGearmanWorker(gearman.GearmanWorker):
def on_job_execute(self, current_job):
print "Job started"
return super(CustomGearmanWorker, self).on_job_execute(current_job)
def task_callback(gearman_worker, job):
print job.data
return job.data
if __name__ == '__main__':
new_worker = CustomGearmanWorker(['10.11.31.86:4730'])
new_worker.register_task("echo", task_callback)
new_worker.work()
###########################
client.py
###########################
#!/usr/bin/env python2.7
# -*- coding:utf-8 -*-
#
from gearman import GearmanClient
new_client = GearmanClient(['10.11.31.86:4730'])
current_request = new_client.submit_job('echo', 'foo')
new_result = current_request.result
print new_result
在一台服务器上启动服务端:
$ gearmand --daemon --listen=10.11.31.86
可以在多台不同的服务器上启动worker:
$ python worker.py
再启动client发布命令:
$ python client.py