
第一步:环境匹配
1)elasticsearch 2.3.3 成功安装部署
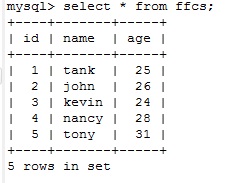
2)mysql安装成功,增删改查无误。
3)要保证elasticsearch-jdbc的版本要与elasticsearch的版本是一致的(下面的内容会提示下载)。否则会报错,无法进行之后的步骤。
(例如elasticsearch-jdbc-2.3.3.0-dist.zip(对应的你的elaseticsearh-2.3.3)
4)(linux 64位centos下安装jdk1.8)(我的是CentOS release 6.5 (Final) )
推荐JDK的版本为1.8最好(我一开始是1.7的报错)--Exception in thread "main" java.lang.UnsupportedClassVersionError: org/xbib/tools/Runner : Unsupported major.minor version 52.0
因为jdk 1.7版本是version 51 而1.6 的是version 50 因此需要安装1.8的版本(version 52)为最佳。否则还没有开始就已经结束了!
rpm -qa|grep jdk //检查之前的版本
java-1.7.0-openjdk-1.7.0.45-2.4.3.3.el6.x86_64 //之前的版本
rpm -e --nodeps java-1.7.0-openjdk-1.7.0.45-2.4.3.3.el6.x86_64 //删除它
下载jdk
网址:
http://www.oracle.com/technetwork/java/javase/downloads/jdk8-downloads-2133151.html
选中Accept License Agreement, 然后打相应的版本点击下载,在这里只介绍源码安装
centos下安装jdk1.8
1.解压文件
tar -zxvf jdk-8u101-linux-x64.tar.gz
2.把解压的文件目录移动到/usr/local下
mv jdk1.8.0_101 /usr/local
3.配置环境变量
vi /etc/profile
放在最后即可
#set java JDK
export JAVA_HOME=/usr/local/jdk1.8.0_101/
export JRE_HOME=${JAVA_HOME}/jre
export CLASSPATH=.:${JAVA_HOME}/lib:${JRE_HOME}/lib
export PATH=${JAVA_HOME}/bin:$PATH
4.使profile马上生效:
source /etc/profile
5.检查配置是否成功
java -version
第二步:下载JDBC工具
选择你需要的版本进行下载。(例如elasticsearch-jdbc-2.3.3.0-dist.zip(对应的你的elaseticsearh-2.3.3),下载后缀为dist.zip的即可)
地址:
http://xbib.org/repository/org/xbib/elasticsearch/importer/elasticsearch-jdbc/
第三步:导入linux下的目录
解压下载的文件unzip elasticsearch-jdbc-2.3.3.0-dist.zip (也可以windows下解压好再导入Linux下就无需此条命令了,推荐工具winscp(用它可以把文件在windows与Linux两个平台间互相拖动数据哦),玩linux必备的工具,还有xshell(用法的话自己摸索一下咯!)
我放在默认的根目录下:/elasticsearch-jdbc-2.3.3.0
第四步:同步导入数据的关键,新建脚本
cd /elasticsearch-jdbc-2.3.3.0/bin/ (在bin目录下建立我们的新脚本)
vi import_es.sh
#!/bin/sh
bin=/elasticsearch-jdbc-2.3.3.0/bin
lib=/elasticsearch-jdbc-2.3.3.0/lib
echo '{
"type" : "jdbc",
"jdbc": {
"elasticsearch.autodiscover":true,
"elasticsearch.cluster":"ffcs-test",集群名字:#默认elasticsearch, 详见elasticsearch.yml
"url":"jdbc:mysql://localhost:3306/test", #mysql数据库地址,3306是默认端口,test是数据库名
"user":"root", #mysql用户名
"password":"123456", #mysql密码
"sql":"select * from ffcs", #ffcs是数据库表名
"index" : "test", #自定义索引名
"type" : "ffcs" #自定义类型名
}
}' | java \
-cp "${lib}/*" \
-Dlog4j.configurationFile=${bin}/log4j2.xml \
org.xbib.tools.Runner \
org.xbib.tools.JDBCImporter
注:复制时其中的#汉字不能复制进去,否则会出现各种莫名状况
之后可以把你写的json内容到www.json.cn验证是够正确,若不正确后面又会报错啦
{
"type" : "jdbc",
"jdbc": {
"elasticsearch.autodiscover":true,
"elasticsearch.cluster":"ffcs-test",
"url":"jdbc:mysql://localhost:3306/test",
"user":"root",
"password":"123456",
"sql":"select * from ffcs",
"index" : "test",
"type" : "ffcs"
}
}
就是上面的内容 去网站上解析检查看看你自己写的是否有错误,避免执行脚本的时候出现不必要的错误
为 import_es.sh 添加可执行权限。
chmod a+x import_es.sh //(a+x 是给所有人加上可执行权限,包括所有者,所属组,和其他人 o+x 只是给其他人加上可执行权限)
执行脚本:./import_es.sh
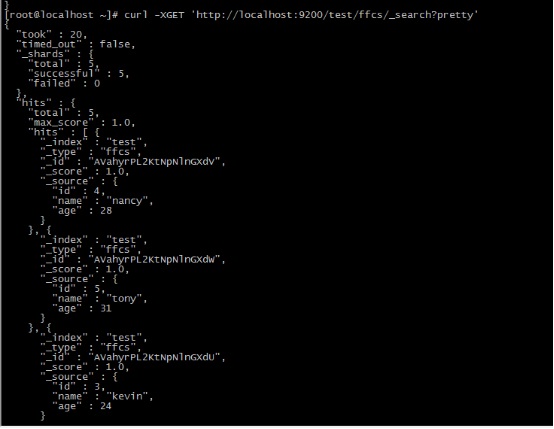
第五步:检测数据是否新增成功
curl 'localhost:9200/_cat/indices?pretty' //索引是否有新增呢??
curl -XGET 'http://localhost:9200/test/ffcs/_search?pretty' //抓取显示数据
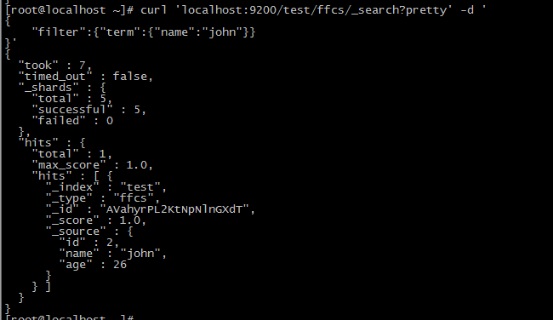
通过各种条件查询
curl 'localhost:9200/test/ffcs/_search?pretty' -d '
{
"filter":{"term":{"name":"john"}}
}'
curl 'localhost:9200/test/ffcs/_search?pretty' -d '
{
"filter":{"term":{"id":"5"}}
}'

以上都可以就说明你大功告成了哦。
我之前也尝试过elasticsearch-1.7.1的版本结果出现错误
[ERROR][importer.jdbc.source.standard][pool-2-thread-1] while opening read connection: jdbc:mysql://localhost:3306/test No suitable driver found for jdbc:mysql://localhost:3306/test
java.sql.SQLException: No suitable driver found for jdbc:mysql://localhost:3306/test
找不到适合的驱动。
这样的情况的话index和type都可以成功建立,可是里面是没数据的哦。