
本文主要介绍了OpenFlow交换机与controller(Floodlight-v1.2)如何搭建一个OpenFlow测试环境
我的设备:controller机器*1 openflow交换机*1 PC机若干
平台细节:
controller机器:Ubuntu14.04+Floodlight-v1.2
PC机:系统随意
一.在ubuntu系统下安装Floodlight,并运行,作为OpenFlow环境的控制器
1.安装openjdk-8, 因为新版本Floodlight-v1.2需要有1.8版本以上的JDK
root@ubuntu:~# add-apt-repository ppa:openjdk-r/ppa
root@ubuntu:~# apt-get update
root@ubuntu:~# apt-get install openjdk-8-jdk
2.安装其它依赖包
root@ubuntu:~# apt-get install build-essential ant python-dev
3.下载floodlight源码包
root@ubuntu:~# git clone git://github.com/floodlight/floodlight.git
4.更新一下
root@ubuntu:~# cd floodlight
root@ubuntu:~# git checkout
root@ubuntu:~# ant
5.修改默认配置, 这里修改控制器监听端口为6633
src/main/resources/floodlightdefault.properties文件中的
net.floodlightcontroller.core.internal.FloodlightProvider.openFlowPort=6633
root@ubuntu:~# ant
6.运行floodlight
root@ubuntu:~# java -jar target/floodlight.jar
正常打印信息为:
13:40:55.874 INFO [n.f.c.m.FloodlightModuleLoader:main] Loading modules from src/main/resources/floodlightdefault.properties
13:40:56.284 WARN [n.f.r.RestApiServer:main] HTTPS disabled; HTTPS will not be used to connect to the REST API.
13:40:56.284 WARN [n.f.r.RestApiServer:main] HTTP enabled; Allowing unsecure access to REST API on port 8080.
13:40:56.285 WARN [n.f.r.RestApiServer:main] CORS access control allow ALL origins: false
13:40:56.629 WARN [n.f.c.i.OFSwitchManager:main] SSL disabled. Using unsecure connections between Floodlight and switches.
13:40:56.629 INFO [n.f.c.i.OFSwitchManager:main] Clear switch flow tables on initial handshake as master: FALSE
13:40:56.629 INFO [n.f.c.i.OFSwitchManager:main] Clear switch flow tables on each transition to master: FALSE
13:40:56.644 INFO [n.f.c.i.OFSwitchManager:main] Setting 0x1 as the default max tables to receive table-miss flow
13:40:56.645 INFO [n.f.c.i.OFSwitchManager:main] Setting max tables to receive table-miss flow to 0x1 for DPID 00:00:00:00:00:00:00:01
13:40:56.645 INFO [n.f.c.i.OFSwitchManager:main] Setting max tables to receive table-miss flow to 0x1 for DPID 00:00:00:00:00:00:00:02
13:40:56.741 INFO [n.f.c.i.OFSwitchManager:main] Computed OpenFlow version bitmap as [62]
13:40:56.744 INFO [n.f.c.i.Controller:main] OpenFlow port set to 6633
13:40:56.744 INFO [n.f.c.i.Controller:main] Number of worker threads set to 8
13:40:56.744 INFO [n.f.c.i.Controller:main] ControllerId set to 1
13:40:56.745 INFO [n.f.c.i.Controller:main] Controller role set to ACTIVE
13:40:56.785 INFO [n.f.l.i.LinkDiscoveryManager:main] Link latency history set to 10 LLDP data points
13:40:56.788 INFO [n.f.l.i.LinkDiscoveryManager:main] Latency update threshold set to +/-0.5 (50.0%) of rolling historical average
13:40:56.800 INFO [n.f.f.Forwarding:main] Default hard timeout not configured. Using 0.
13:40:56.800 INFO [n.f.f.Forwarding:main] Default idle timeout set to 5.
13:40:56.800 INFO [n.f.f.Forwarding:main] Default priority not configured. Using 1.
13:40:56.800 INFO [n.f.f.Forwarding:main] Default flags will be set to SEND_FLOW_REM.
13:40:56.801 INFO [n.f.f.Forwarding:main] Default flow matches set to: VLAN=true, MAC=true, IP=true, TPPT=true
13:40:56.801 INFO [n.f.f.Forwarding:main] Not flooding ARP packets. ARP flows will be inserted for known destinations
13:40:56.801 INFO [n.f.f.Forwarding:main] Flows will be removed on link/port down events
13:40:56.802 INFO [n.f.s.StatisticsCollector:main] Statistics collection disabled
13:40:56.802 INFO [n.f.s.StatisticsCollector:main] Port statistics collection interval set to 10s
13:40:56.873 INFO [o.s.s.i.SyncManager:main] [1] Updating sync configuration ClusterConfig [allNodes={1=Node [hostname=192.168.1.100, port=6642, nodeId=1, domainId=1], 2=Node [hostname=192.168.1.100, port=6643, nodeId=2, domainId=1]}, authScheme=CHALLENGE_RESPONSE, keyStorePath=/etc/floodlight/key2.jceks, keyStorePassword is set]
13:40:57.040 INFO [o.s.s.i.r.RPCService:main] Listening for internal floodlight RPC on 0.0.0.0/0.0.0.0:6642
13:40:57.068 INFO [n.f.c.i.OFSwitchManager:main] Listening for switch connections on /0.0.0.0:6633
13:40:57.079 INFO [n.f.l.i.LinkDiscoveryManager:main] Setting autoportfast feature to OFF
13:40:57.426 INFO [o.r.C.I.Server:main] Starting the Simple [HTTP/1.1] server on port 8080
13:40:57.427 INFO [org.restlet:main] Starting net.floodlightcontroller.restserver.RestApiServer$RestApplication application
13:41:00.737 INFO [n.f.j.JythonServer:debugserver-main] Starting DebugServer on :6655
.......
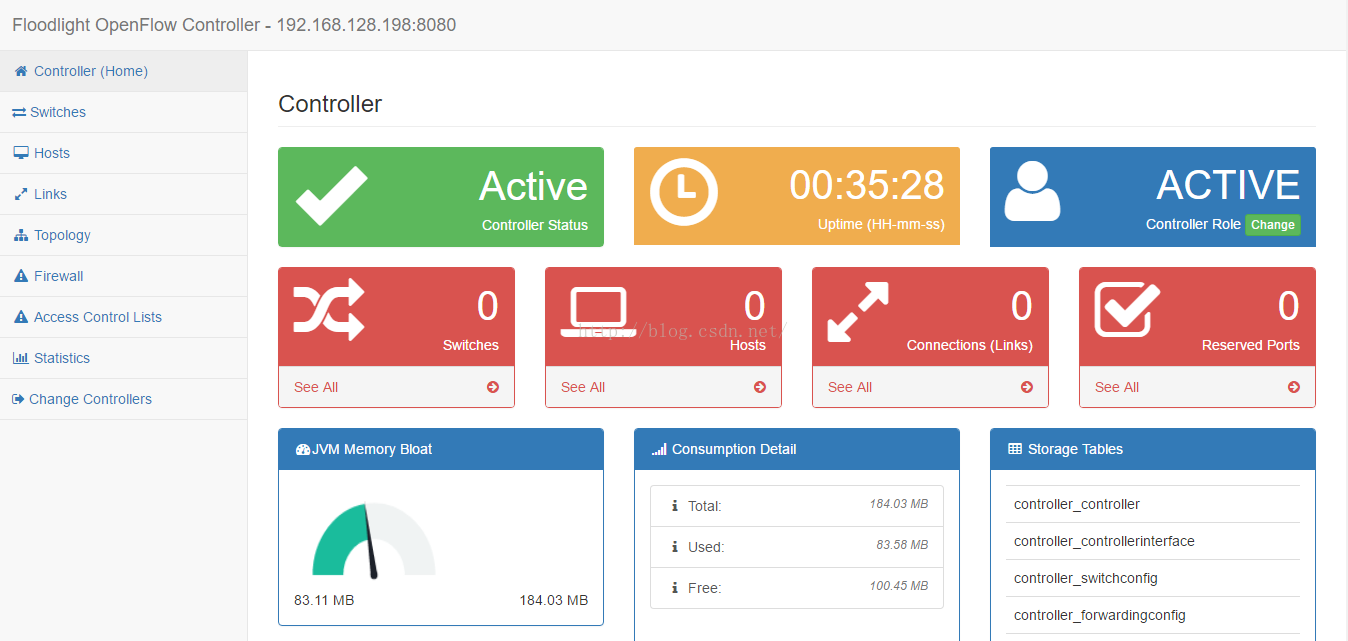
7.登陆floodlight管理页面WEB
http://192.168.128.198:8080/ui/index.html
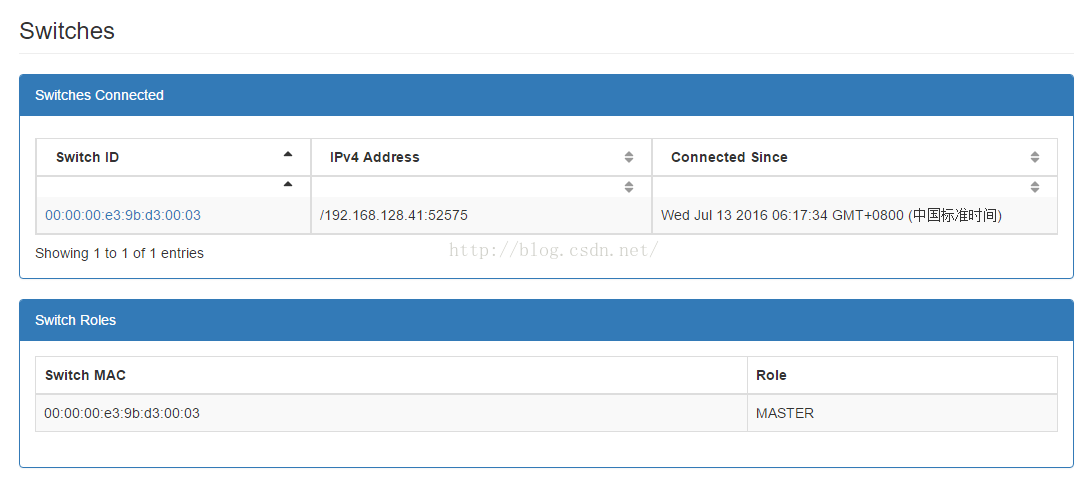
二.配置好openflow交换机
配置好交换机的管理地址, 使管理口地址与controller地址在同一个网络中, 确保IP可达.
在交换机上做相关配置:
1.创建一个ovs的网桥
[root@ovs root]# ovs-vsctl add-br br0
2.添加端口到ovs
[root@ovs root]# ovs-vsctl add-port br0 xe1
[root@ovs root]# ovs-vsctl add-port br0 xe2
[root@ovs root]# ovs-vsctl add-port br0 xe3
[root@ovs root]# ovs-vsctl add-port br0 xe14
3.设置控制器
[root@ovs root]# ovs-vsctl set-controller br0 tcp:192.168.128.198:6633
4.可用以下命令对openflow版本进行切换
[root@ovs root]# ovs-vsctl set bridge br0 protocols=OpenFlow13
三.将若干PC机与交换机接口相连,并在floodlight上查看信息,可以发现有OpenFlow Switch与之相连,并能在floodlight管理界面上查看到连接上的PC机与拓扑
四.通过floodlight管理openflow交换机流表
下面介绍一下从控制器端对openflow交换机添加与删除流表
1.添加流表
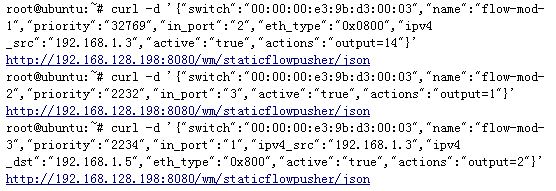
可变参数解析:
"switch"为openflow交换机唯一的DPID.
"name"为该流表的名字(索引),后可用此名字(索引)来删除该流表.
"in_port":流表匹配项,参数为入接口
"ipv4_dst":流表匹配项,匹配目的IP
"ipv4_src":流表匹配项,匹配源IP
"eth_type":流表匹配项,匹配以太类型
"actions":流表actions
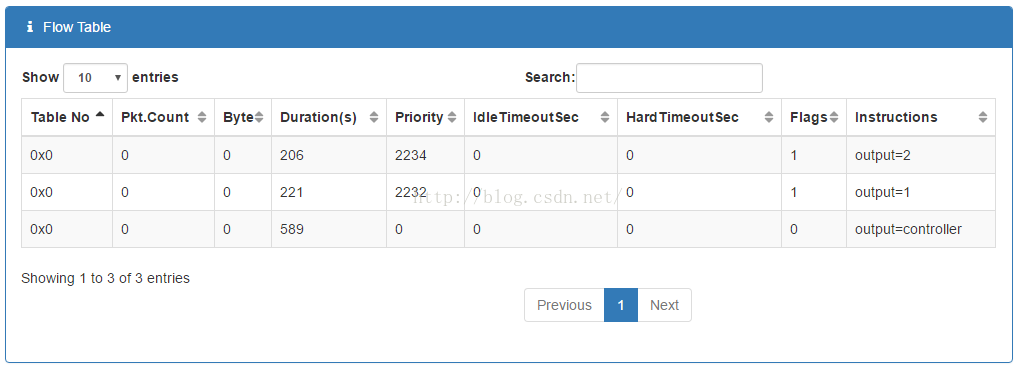
2.读取流表
root@ubuntu:~# curl http://192.168.128.198:8080/wm/core/switch/00:00:00:e3:9b:d3:00:03/flow/json
3.删除流表
a).删除所有流表
root@ubuntu:~# curl http://192.168.128.198:8080/wm/staticflowpusher/clear/00:00:00:e3:9b:d3:00:03/json
b).删除单条流表
root@ubuntu:~# curl -X DELETE -d '{"switch":"00:00:00:e3:9b:d3:00:03","name":"flow-mod-1"}' http://192.168.128.198:8080/wm/staticflowpusher/json