
Snap是一个在Ubuntu系统上一个新的技术.如果大家对这个技术还不是很理解的话,可以参阅文章"安装snap应用到Ubuntu 16.4桌面系统"(http://www.linuxdiyf.com/linux/22311.html).我们知道MySQL及Tomcat是在Java服务器端常用的技术.那么我们怎么来把它打包到我们的snap应用中去呢?很多人可能以为这个很简单.我们可以直接在snapcraft.yaml中使用stage-package来安装现有的debian包,不就可以了吗?其实,由于在snap系统的安全性限制,在一个snap应用被成功安装后,它自己所在的目录是只读的,不可以写入任何的数据.我们只有规定的部分目录才是可以写入的.我们以hello例程为例,我们有如下的目录可以使用:
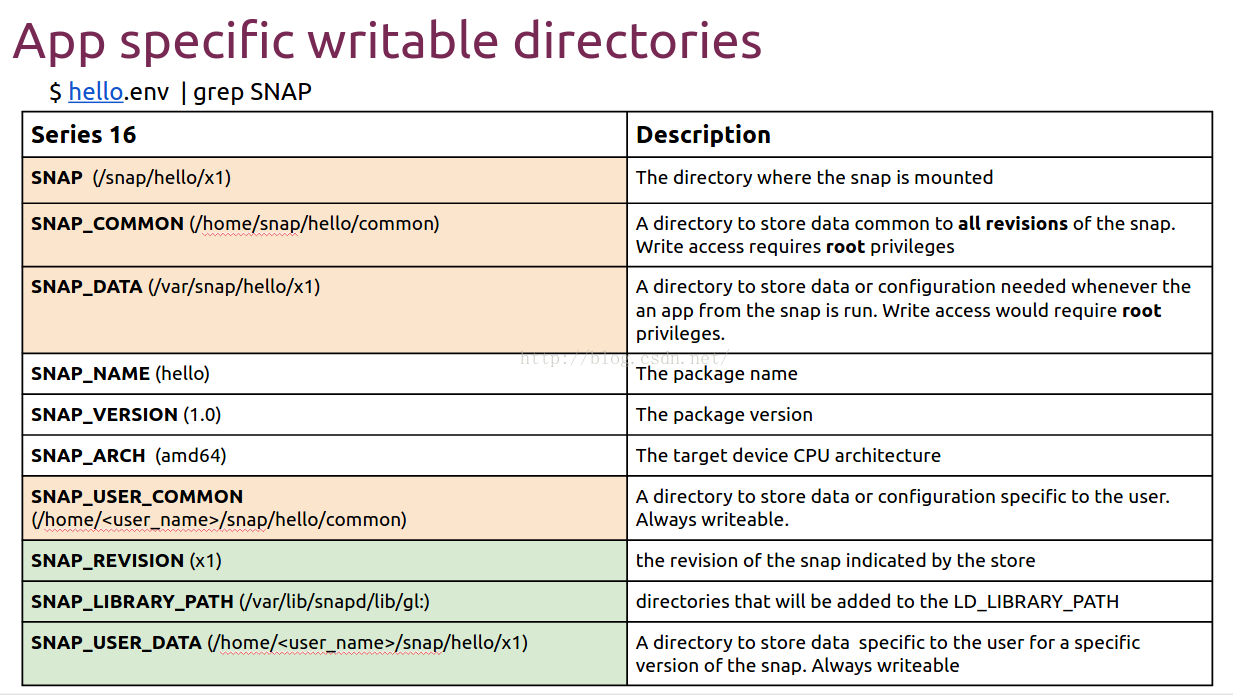
在上面,有两个最重要的目录:
SNAP_DATA
SNAP
在我们snap我们应用的时候,我们需要configure我们的应用尽量使用上面的两个目录,而不需要hard-code我们的目录.特别是由于我们的应用不能向自己的安装目录SNAP写入任何的数据(read-only),所以,我们必须把我们的数据库及需要写入数据的文件设置到SNAP_DATA目录中.另外必须注意的是,访问SNAP_DATA文件目录时需要root权限.这对于一个daemon的应用来说,应该没有问题,但是对于一般的应用来说,我们需要使用sudo来访问才可以访问到数据库.
1)snap Tomcat
在我们的snapcraft中有一个例程叫做"tomcat-webapp-demo"(https://github.com/snapcore/snapcraft/tree/master/demos/tomcat-maven-webapp).它提供了一个很好的基础.
snapcraft.yaml(https://github.com/snapcore/snapcraft/blob/master/demos/tomcat-maven-webapp/snapcraft.yaml)
name: tomcat-webapp-demo
version: 1.0
architectures:
- amd64
summary: Demo of Tomcat-hosted Webapp
description: This is a demo snap of a Tomcat-hosted webapp produced by snapcraft with maven.
confinement: strict
apps:
tomcat:
command: bin/wrapper
daemon: simple
plugs: [network-bind]
parts:
webapp:
plugin: maven
source: https://github.com/lool/snappy-mvn-demo.git
source-type: git
tomcat:
plugin: dump
source: https://archive.apache.org/dist/tomcat/tomcat-8/v8.0.29/bin/apache-tomcat-8.0.29.tar.gz
local-files:
plugin: make
source: .
从上面我们可以看出来,它使用了dump plugin.这个plugin只有在snapcraft 2.14中才开始适使用,并最终代替copy plugin. 对于以前的版本我们可以使用tar-content来代替dump.从上面的代码中可以看出来,它知己从官网上下载所需要的版本,并做一个安装.在启动的时候,它使用bin/wrapper来启动.wrapper的内容如下:
wrapper(https://github.com/snapcore/snapcraft/blob/master/demos/tomcat-maven-webapp/wrapper)
#!/bin/sh
set -e
set -x
# installation pathes are based of CATALINA_HOME
export CATALINA_HOME="$SNAP"
# writable pathes are based of CATALINA_BASE
export CATALINA_BASE="$SNAP_DATA"
# create runtime data
mkdir -p "$CATALINA_BASE/logs"
mkdir -p "$CATALINA_BASE/temp"
if ! [ -d $CATALINA_BASE/conf ]; then
echo "conf directory does not exist"
cp -rd $CATALINA_HOME/tomcat-conf $CATALINA_BASE/conf
fi
if ! [ -d $CATALINA_BASE/webapps ]; then
echo "webapps directory does not exist"
cp -rd $CATALINA_HOME/webapps $CATALINA_BASE/
cp $CATALINA_HOME/war/*.war $CATALINA_BASE/webapps/
fi
$CATALINA_HOME/bin/catalina.sh run
从上面的代码中,我们可以看出来我们已经把我们所需要的目录用SNAP及SNAP_DATA来代替了.
2)snap MySQL
我们可以先看一下文章"Snapping Nextcloud: MySQL"(https://kyrofa.com/posts/snapping-nextcloud-mysql).从该文章中,我们可以看出来,直接通过stage-package的方式来snap MySQL是不可能的.我们可以直接编译MySQL源码的方式来snap MySQL.
snapcraft.yaml
# Download the boost headers for MySQL. Note that the version used may need to
# be updated if the version of MySQL changes.
boost:
plugin: copy
source: http://sourceforge.net/projects/boost/files/boost/1.59.0/boost_1_59_0.tar.gz
files:
'*': boost/
snap:
- -*
mysql:
plugin: cmake
source: https://github.com/kyrofa/mysql-server.git
source-type: git
source-branch: feature/support_no_setpriority
after: [boost]
configflags:
- -DWITH_BOOST=$SNAPCRAFT_STAGE/boost
- -DWITH_INNODB_PAGE_CLEANER_PRIORITY=OFF
- -DCMAKE_INSTALL_PREFIX=/
- -DBUILD_CONFIG=mysql_release
- -DWITH_UNIT_TESTS=OFF
- -DWITH_EMBEDDED_SERVER=OFF
- -DWITH_EMBEDDED_SHARED_LIBRARY=OFF
- -DWITH_ARCHIVE_STORAGE_ENGINE=OFF
- -DWITH_BLACKHOLE_STORAGE_ENGINE=OFF
- -DWITH_FEDERATED_STORAGE_ENGINE=OFF
- -DWITH_PARTITION_STORAGE_ENGINE=OFF
- -DINSTALL_MYSQLTESTDIR=
build-packages:
- wget
- g++
- cmake
- bison
- libncurses5-dev
- libaio-dev
stage:
# Remove scripts that we'll be replacing with our own
- -support-files/mysql.server
snap:
# Remove scripts that we'll be replacing with our own
- -support-files/mysql.server
# Remove unused binaries that waste space
- -bin/innochecksum
- -bin/lz4_decompress
- -bin/myisam*
- -bin/mysqladmin
- -bin/mysqlbinlog
- -bin/mysql_client_test
- -bin/mysql_config*
- -bin/mysqld_multi
- -bin/mysqldump*
- -bin/mysqlimport
- -bin/mysql_install_db
- -bin/mysql_plugin
- -bin/mysqlpump
- -bin/mysql_secure_installation
- -bin/mysqlshow
- -bin/mysqlslap
- -bin/mysql_ssl_rsa_setup
- -bin/mysqltest
- -bin/mysql_tzinfo_to_sql
- -bin/perror
- -bin/replace
- -bin/resolveip
- -bin/resolve_stack_dump
- -bin/zlib_decompress
# Copy over our MySQL scripts
mysql-customizations:
plugin: copy
files:
# This one is what creates the initial database and account for ownCloud.
src/mysql/start_mysql: bin/
src/mysql/my.cnf: my.cnf
src/mysql/mysql.server: support-files/
sample.war: war/sample.war
mysql-connector-java-6.0.3.jar: lib/mysql-connector-java-6.0.3.jar
由于编译MySQL时需要用到boost库,所以直接把boost库的源码下载下来,当然,在我们snap时,我们并不需要它,所以:
snap:
- -*
就想我们之前snap我们的tomcat时一样,我们需要对MySQL的配置进行改变才可以:
src/mysql/my.cnf
[mysqld]
user=root
max_allowed_packet=100M
secure-file-priv=NULL
port=3306
bind-address=0.0.0.0
[client]
protocol=tcp
在这里,我们配置了所需要的port号码及使用的协议TCP.这样我们的数据库可以位于任何一个单独的服务器中(我们可以修改这里的bind-address).在我们的设计中,MySQL的数据库位于本机.这样当我们的MySQL服务器运行时,可以看到:
liuxg@liuxg:~$ netstat -lnp46 | grep -w 3306
(Not all processes could be identified, non-owned process info
will not be shown, you would have to be root to see it all.)
tcp0 0 0.0.0.0:33060.0.0.0:*LISTEN -
src/mysql/mysql.server
这个文件是我们在我们的下面的start_mysql的脚本中被使用的:
$SNAP/support-files/mysql.server start
该脚本的内容如下:
#!/bin/sh
# Copyright Abandoned 1996 TCX DataKonsult AB & Monty Program KB & Detron HB
# This file is public domain and comes with NO WARRANTY of any kind
# MySQL daemon start/stop script.
# Usually this is put in /etc/init.d (at least on machines SYSV R4 based
# systems) and linked to /etc/rc3.d/S99mysql and /etc/rc0.d/K01mysql.
# When this is done the mysql server will be started when the machine is
# started and shut down when the systems goes down.
# Comments to support chkconfig on RedHat Linux
# chkconfig: 2345 64 36
# description: A very fast and reliable SQL database engine.
# Comments to support LSB init script conventions
### BEGIN INIT INFO
# Provides: mysql
# Required-Start: $local_fs $network $remote_fs
# Should-Start: ypbind nscd ldap ntpd xntpd
# Required-Stop: $local_fs $network $remote_fs
# Default-Start: 2 3 4 5
# Default-Stop: 0 1 6
# Short-Description: start and stop MySQL
# Description: MySQL is a very fast and reliable SQL database engine.
### END INIT INFO
# If you install MySQL on some other places than /, then you
# have to do one of the following things for this script to work:
#
# - Run this script from within the MySQL installation directory
# - Create a /etc/my.cnf file with the following information:
#[mysqld]
#basedir=<path-to-mysql-installation-directory>
# - Add the above to any other configuration file (for example ~/.my.ini)
#and copy my_print_defaults to /usr/bin
# - Add the path to the mysql-installation-directory to the basedir variable
#below.
#
# If you want to affect other MySQL variables, you should make your changes
# in the /etc/my.cnf, ~/.my.cnf or other MySQL configuration files.
# If you change base dir, you must also change datadir. These may get
# overwritten by settings in the MySQL configuration files.
basedir=$SNAP
datadir=$SNAP_DATA/mysql
# Default value, in seconds, afterwhich the script should timeout waiting
# for server start.
# Value here is overriden by value in my.cnf.
# 0 means don't wait at all
# Negative numbers mean to wait indefinitely
service_startup_timeout=900
# Lock directory for RedHat / SuSE.
lockdir="$SNAP_DATA/mysql/lock"
lock_file_path="$lockdir/mysql"
# The following variables are only set for letting mysql.server find things.
# Set some defaults
mysqld_pid_file_path=
if test -z "$basedir"
then
basedir=/
bindir=//bin
if test -z "$datadir"
then
datadir=//data
fi
sbindir=//bin
libexecdir=//bin
else
bindir="$basedir/bin"
if test -z "$datadir"
then
datadir="$basedir/data"
fi
sbindir="$basedir/sbin"
libexecdir="$basedir/libexec"
fi
# datadir_set is used to determine if datadir was set (and so should be
# *not* set inside of the --basedir= handler.)
datadir_set=
#
# Use LSB init script functions for printing messages, if possible
#
lsb_functions="/lib/lsb/init-functions"
if test -f $lsb_functions ; then
. $lsb_functions
else
log_success_msg()
{
echo " SUCCESS! $@"
}
log_failure_msg()
{
echo " ERROR! $@"
}
fi
PATH="/sbin:/usr/sbin:/bin:/usr/bin:$basedir/bin"
export PATH
mode=$1# start or stop
[ $# -ge 1 ] && shift
other_args="$*"# uncommon, but needed when called from an RPM upgrade action
# Expected: "--skip-networking --skip-grant-tables"
# They are not checked here, intentionally, as it is the resposibility
# of the "spec" file author to give correct arguments only.
case `echo "testing\c"`,`echo -n testing` in
*c*,-n*) echo_n=echo_c= ;;
*c*,*)echo_n=-n echo_c= ;;
*)echo_n=echo_c='\c' ;;
esac
parse_server_arguments() {
for arg do
case "$arg" in
--basedir=*) basedir=`echo "$arg" | sed -e 's/^[^=]*=//'`
bindir="$basedir/bin"
if test -z "$datadir_set"; then
datadir="$basedir/data"
fi
sbindir="$basedir/sbin"
libexecdir="$basedir/libexec"
;;
--datadir=*) datadir=`echo "$arg" | sed -e 's/^[^=]*=//'`
datadir_set=1
;;
--pid-file=*) mysqld_pid_file_path=`echo "$arg" | sed -e 's/^[^=]*=//'` ;;
--service-startup-timeout=*) service_startup_timeout=`echo "$arg" | sed -e 's/^[^=]*=//'` ;;
esac
done
}
wait_for_pid () {
verb="$1"# created | removed
pid="$2"# process ID of the program operating on the pid-file
pid_file_path="$3" # path to the PID file.
i=0
avoid_race_condition="by checking again"
while test $i -ne $service_startup_timeout ; do
case "$verb" in
'created')
# wait for a PID-file to pop into existence.
test -s "$pid_file_path" && i='' && break
;;
'removed')
# wait for this PID-file to disappear
test ! -s "$pid_file_path" && i='' && break
;;
*)
echo "wait_for_pid () usage: wait_for_pid created|removed pid pid_file_path"
exit 1
;;
esac
# if server isn't running, then pid-file will never be updated
if test -n "$pid"; then
if kill -0 "$pid" 2>/dev/null; then
: # the server still runs
else
# The server may have exited between the last pid-file check and now.
if test -n "$avoid_race_condition"; then
avoid_race_condition=""
continue # Check again.
fi
# there's nothing that will affect the file.
log_failure_msg "The server quit without updating PID file ($pid_file_path)."
return 1 # not waiting any more.
fi
fi
echo $echo_n ".$echo_c"
i=`expr $i + 1`
sleep 1
done
if test -z "$i" ; then
log_success_msg
return 0
else
log_failure_msg
return 1
fi
}
# Get arguments from the my.cnf file,
# the only group, which is read from now on is [mysqld]
if test -x ./bin/my_print_defaults
then
print_defaults="./bin/my_print_defaults"
elif test -x $bindir/my_print_defaults
then
print_defaults="$bindir/my_print_defaults"
elif test -x $bindir/mysql_print_defaults
then
print_defaults="$bindir/mysql_print_defaults"
else
# Try to find basedir in /etc/my.cnf
conf=/etc/my.cnf
print_defaults=
if test -r $conf
then
subpat='^[^=]*basedir[^=]*=.∗$'
dirs=`sed -e "/$subpat/!d" -e 's//\1/' $conf`
for d in $dirs
do
d=`echo $d | sed -e 's/[ ]//g'`
if test -x "$d/bin/my_print_defaults"
then
print_defaults="$d/bin/my_print_defaults"
break
fi
if test -x "$d/bin/mysql_print_defaults"
then
print_defaults="$d/bin/mysql_print_defaults"
break
fi
done
fi
# Hope it's in the PATH ... but I doubt it
test -z "$print_defaults" && print_defaults="my_print_defaults"
fi
#
# Read defaults file from 'basedir'.If there is no defaults file there
# check if it's in the old (depricated) place (datadir) and read it from there
#
extra_args=""
if test -r "$basedir/my.cnf"
then
extra_args="-e $basedir/my.cnf"
else
if test -r "$datadir/my.cnf"
then
extra_args="-e $datadir/my.cnf"
fi
fi
parse_server_arguments `$print_defaults $extra_args mysqld server mysql_server mysql.server`
#
# Set pid file if not given
#
if test -z "$mysqld_pid_file_path"
then
mysqld_pid_file_path=$datadir/`hostname`.pid
else
case "$mysqld_pid_file_path" in
/* ) ;;
* ) mysqld_pid_file_path="$datadir/$mysqld_pid_file_path" ;;
esac
fi
case "$mode" in
'start')
# Start daemon
# Safeguard (relative paths, core dumps..)
cd $basedir
echo $echo_n "Starting MySQL"
if test -x $bindir/mysqld_safe
then
# Give extra arguments to mysqld with the my.cnf file. This script
# may be overwritten at next upgrade.
$bindir/mysqld_safe --datadir="$datadir" --pid-file="$mysqld_pid_file_path" --lc-messages-dir="$SNAP/share" $other_args >/dev/null 2>&1 &
wait_for_pid created "$!" "$mysqld_pid_file_path"; return_value=$?
# Make lock for RedHat / SuSE
if test -w "$lockdir"
then
touch "$lock_file_path"
fi
exit $return_value
else
log_failure_msg "Couldn't find MySQL server ($bindir/mysqld_safe)"
fi
;;
'stop')
# Stop daemon. We use a signal here to avoid having to know the
# root password.
if test -s "$mysqld_pid_file_path"
then
# signal mysqld_safe that it needs to stop
touch "$mysqld_pid_file_path.shutdown"
mysqld_pid=`cat "$mysqld_pid_file_path"`
if (kill -0 $mysqld_pid 2>/dev/null)
then
echo $echo_n "Shutting down MySQL"
kill $mysqld_pid
# mysqld should remove the pid file when it exits, so wait for it.
wait_for_pid removed "$mysqld_pid" "$mysqld_pid_file_path"; return_value=$?
else
log_failure_msg "MySQL server process #$mysqld_pid is not running!"
rm "$mysqld_pid_file_path"
fi
# Delete lock for RedHat / SuSE
if test -f "$lock_file_path"
then
rm -f "$lock_file_path"
fi
exit $return_value
else
log_failure_msg "MySQL server PID file could not be found!"
fi
;;
'restart')
# Stop the service and regardless of whether it was
# running or not, start it again.
if $0 stop $other_args; then
$0 start $other_args
else
log_failure_msg "Failed to stop running server, so refusing to try to start."
exit 1
fi
;;
'reload'|'force-reload')
if test -s "$mysqld_pid_file_path" ; then
read mysqld_pid < "$mysqld_pid_file_path"
kill -HUP $mysqld_pid && log_success_msg "Reloading service MySQL"
touch "$mysqld_pid_file_path"
else
log_failure_msg "MySQL PID file could not be found!"
exit 1
fi
;;
'status')
# First, check to see if pid file exists
if test -s "$mysqld_pid_file_path" ; then
read mysqld_pid < "$mysqld_pid_file_path"
if kill -0 $mysqld_pid 2>/dev/null ; then
log_success_msg "MySQL running ($mysqld_pid)"
exit 0
else
log_failure_msg "MySQL is not running, but PID file exists"
exit 1
fi
else
# Try to find appropriate mysqld process
mysqld_pid=`pidof $libexecdir/mysqld`
# test if multiple pids exist
pid_count=`echo $mysqld_pid | wc -w`
if test $pid_count -gt 1 ; then
log_failure_msg "Multiple MySQL running but PID file could not be found ($mysqld_pid)"
exit 5
elif test -z $mysqld_pid ; then
if test -f "$lock_file_path" ; then
log_failure_msg "MySQL is not running, but lock file ($lock_file_path) exists"
exit 2
fi
log_failure_msg "MySQL is not running"
exit 3
else
log_failure_msg "MySQL is running but PID file could not be found"
exit 4
fi
fi
;;
*)
# usage
basename=`basename "$0"`
echo "Usage: $basename {start|stop|restart|reload|force-reload|status} [ MySQL server options ]"
exit 1
;;
esac
exit 0
这个脚本的内容其实和标准的从MySQL编译后的脚本没有什么大的差别.除了如下的地方发生改变:
basedir=$SNAP
datadir=$SNAP_DATA/mysql
这个地方的改变是为了提供我们运行文件的参考目录位置及数据库的文件位置.
src/mysql/start_mysql
这是一个我们需要的脚本来真正启动我们的MySQL服务器:
mysql:
command: start_mysql
stop-command: support-files/mysql.server stop
daemon: simple
plugs: [network, network-bind]
显然这是一个daemon应用.它的内容如下:
#!/bin/sh
root_option_file="$SNAP_DATA/mysql/root.ini"
demouser_password_file="$SNAP_DATA/mysql/demouser_password"
mysqld_pid_file_path=$SNAP_DATA/mysql/`hostname`.pid
#mysql_socket_file_path=$SNAP_DATA/mysql/mysql.sock
new_install=false
# Make sure the database is initialized (this is safe to run if already
# initialized)
mysqld --initialize-insecure --basedir="$SNAP" --datadir="$SNAP_DATA/mysql" --lc-messages-dir="$SNAP/share"
# If the above command succeeded, it means this is a new installation.
if [ $? -eq 0 ]; then
echo "it is new install"
new_install=true
fi
# Start mysql
$SNAP/support-files/mysql.server start
# Initialize new installation if necessary.
if [ $new_install = true ]; then
# Generate a password for the root mysql user.
echo -n "Generating root mysql password... "
root_password="123"
echo "done."
# Generate a password for the owncloud mysql user.
echo -n "Generating owncloud mysql password... "
demouser_password="123"
echo "done."
# Save root user information
echo "writing client"
echo "[client]" >> $root_option_file
echo "writing user=root"
echo "user=root" >> $root_option_file
chmod 600 $root_option_file
echo "dump the root option file"
cat $root_option_file
# Now set everything up in one step:
# 1) Set the root user's password
# 2) Create the 'demouser' user
# 3) Create the 'demodb' database
# 4) Grant the 'demodb' user privileges on the 'demodb' database
echo -n "Setting up users and owncloud database... "
mysql --defaults-file=$root_option_file <<SQL
ALTER USER 'root'@'localhost' IDENTIFIED BY '$root_password';
CREATE USER 'demouser'@'localhost' IDENTIFIED BY '$demouser_password';
CREATE DATABASE demodb;
GRANT ALL PRIVILEGES ON demodb.* TO 'demouser'@'localhost' IDENTIFIED BY '$demouser_password';
USE demodb;
create table Employees
(
id int not null,
age int not null,
first varchar (255),
last varchar (255)
);
INSERT INTO Employees VALUES (100, 18, 'Zara', 'Ali');
INSERT INTO Employees VALUES (101, 25, 'Mahnaz', 'Fatma');
INSERT INTO Employees VALUES (102, 30, 'Zaid', 'Khan');
INSERT INTO Employees VALUES (103, 28, 'Sumit', 'Mittal');
SQL
if [ $? -eq 0 ]; then
echo "done."
else
echo "Failed to initialize-- reverting..."
$SNAP/support-files/mysql.server stop
rm -rf $SNAP_DATA/mysql/*
fi
# Now the root mysql user has a password. Save that as well.
echo "writing root password"
echo "password=$root_password" >> $root_option_file
fi
# Wait here until mysql is running
echo "Waiting for server..."
#while [ ! -f "$mysqld_pid_file_path" -o ! -S "$mysql_socket_file_path" ]; do
while [ ! -f "$mysqld_pid_file_path" -o ]; do
sleep 1
done
# Check and upgrade mysql tables if necessary. This will return 0 if the upgrade
# succeeded, in which case we need to restart mysql.
echo "Checking/upgrading mysql tables if necessary..."
mysql_upgrade --defaults-file=$root_option_file
if [ $? -eq 0 ]; then
echo "Restarting mysql server after upgrade..."
$SNAP/support-files/mysql.server restart
echo "Waiting for server to come back after upgrade..."
#while [ ! -f "$mysqld_pid_file_path" -o ! -S "$mysql_socket_file_path" ]; do
while [ ! -f "$mysqld_pid_file_path" -o ]; do
sleep 1
done
fi
# If this was a new installation, wait until the server is all up and running
# before saving off the owncloud user's password. This way the presence of the
# file can be used as a signal that mysql is ready to be used.
if [ $new_install = true ]; then
echo "$demouser_password" > $demouser_password_file
fi
# Wait here until mysql exits (turn a forking service into simple). This is
# only needed for Ubuntu Core 15.04, as 16.04 supports forking services.
mysqld_pid=$(cat "$mysqld_pid_file_path")
while kill -0 $mysqld_pid 2>/dev/null; do
sleep 1
done
我们在table中也创建了几个记录.在这里也请大家注意,我hard-code了数据库的密码"123".这个密码在我们以后的数据库访问中需要用到.注意我们在这里已经创建了两个用户,一个叫做root,另外一个叫做demouser.
mysql --defaults-file=$root_option_file <<SQL
ALTER USER 'root'@'localhost' IDENTIFIED BY '$root_password';
CREATE USER 'demouser'@'localhost' IDENTIFIED BY '$demouser_password';
CREATE DATABASE demodb;
GRANT ALL PRIVILEGES ON demodb.* TO 'demouser'@'localhost' IDENTIFIED BY '$demouser_password';
USE demodb;
create table Employees
(
id int not null,
age int not null,
first varchar (255),
last varchar (255)
);
INSERT INTO Employees VALUES (100, 18, 'Zara', 'Ali');
INSERT INTO Employees VALUES (101, 25, 'Mahnaz', 'Fatma');
INSERT INTO Employees VALUES (102, 30, 'Zaid', 'Khan');
INSERT INTO Employees VALUES (103, 28, 'Sumit', 'Mittal');
SQL
如何调用MySQL命令行
我们在snapcraft.yaml文档中,定义了如下的command:
mysql-client:
command: mysql --defaults-file=$SNAP_DATA/mysql/root.ini --protocol=TCP
plugs: [network, network-bind]
由于在MySQL的命令行中需要访问到数据库,需要root权限.我们可以通过su命令进入到root用户:
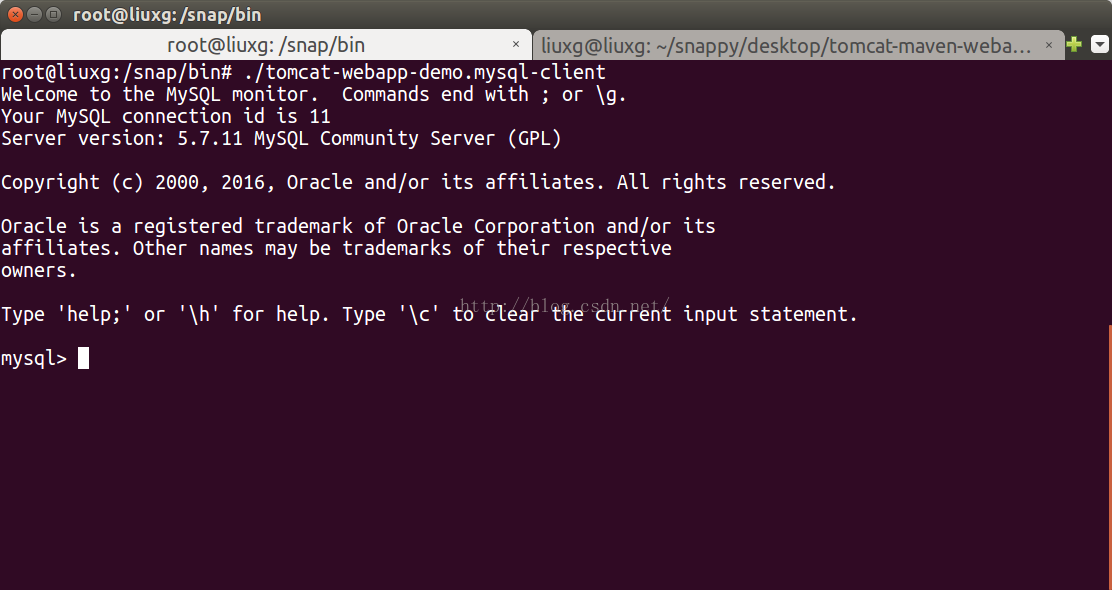
我们可以通过运行我们定义的命令来启动MySQL客户端.通过这个命令,我们可以创建我们的数据等操作.
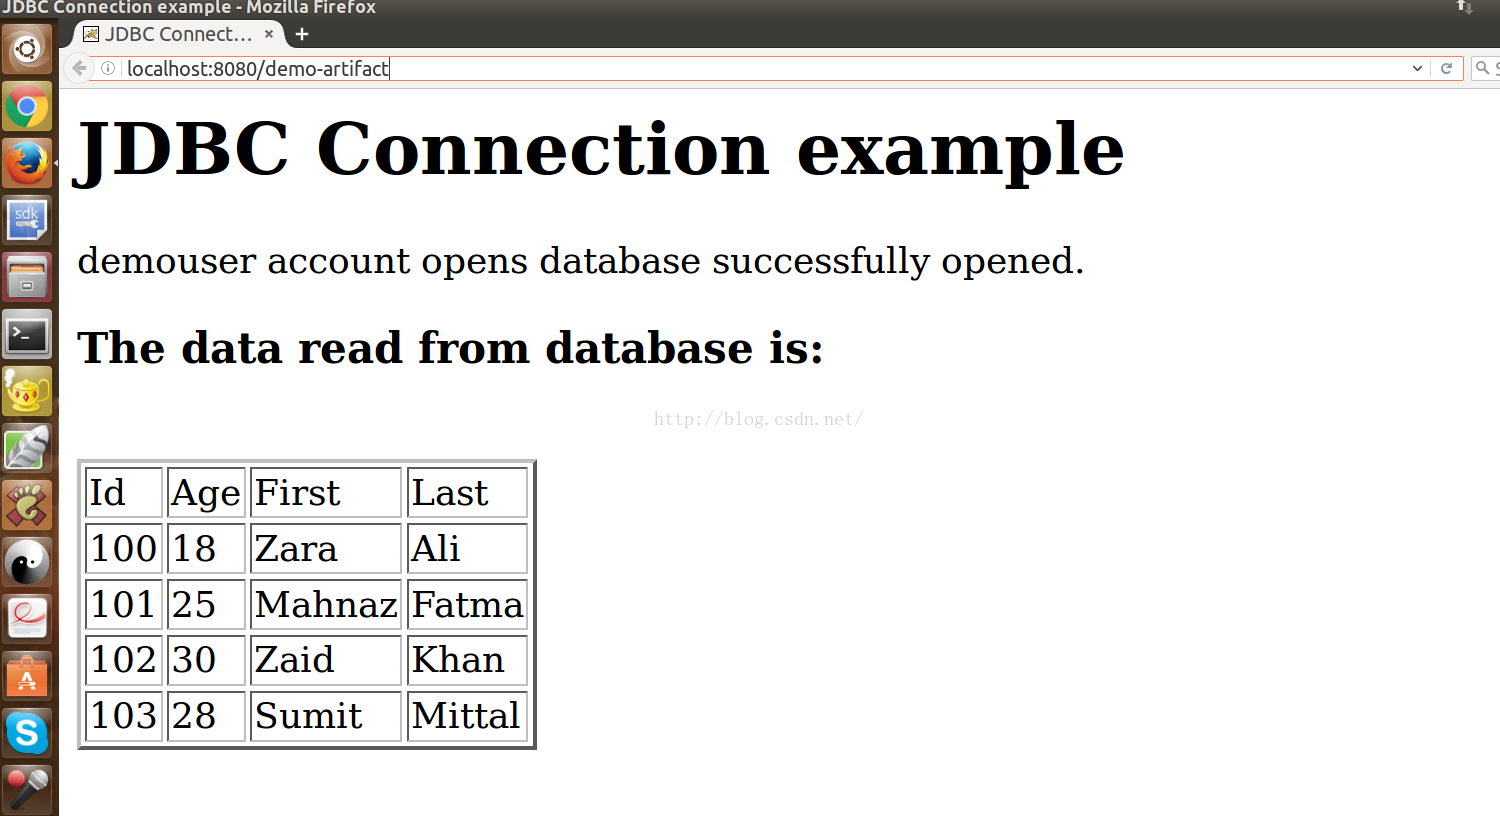
3)JSP 数据库访问
最后,我们需要一个JSP的程序来访问我们的数据库.我们的设计如下:
<%@ page import="java.sql.*"%>
<html>
<head>
<title>JDBC Connection example</title>
</head>
<body>
<h1>JDBC Connection example</h1>
<%
String user = "demouser";
String password = "123";
try {
java.sql.Connection con;
Class.forName("com.mysql.jdbc.Driver");
con = DriverManager.getConnection("jdbc:mysql://localhost:3306/demodb", user, password);
out.println (user + " account opens database successfully opened.");
String query="select * from Employees";
Statement stmt=con.createStatement();
ResultSet rs=stmt.executeQuery(query);
%>
<br />
<h3>The data read from database is:</h3>
<br />
<table border="2">
<tr>
<td>Id</td>
<td>Age</td>
<td>First</td>
<td>Last</td>
</tr>
<%
while(rs.next())
{
%>
<tr>
<td><%=rs.getInt("id")%></td>
<td><%=rs.getInt("age")%></td>
<td><%=rs.getString("first")%></td>
<td><%=rs.getString("last")%></td>
</tr>
<%
}
%>
</table>
<%
// close the connection
rs.close();
stmt.close();
con.close();
}
catch(SQLException e) {
out.println("SQLException caught: " +e.getMessage());
}
%>
</body>
</html>
最终打包我们的应用,并部署我们的应用.我们可以看到最终的结果为:
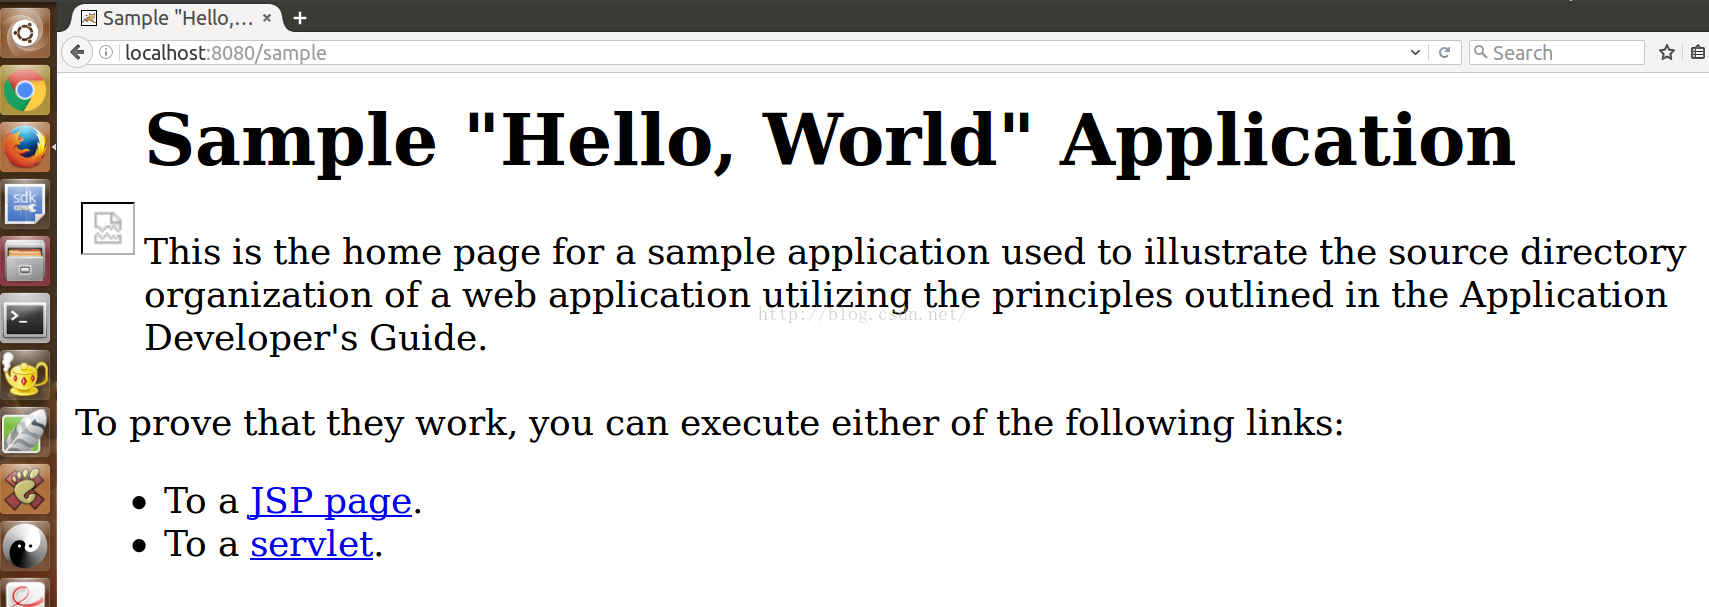
在实际的使用中,我们也可以把我们已经开发好的war包放入到我们的tomcat的目录中:
mysql-customizations:
plugin: copy
files:
# This one is what creates the initial database and account for ownCloud.
src/mysql/start_mysql: bin/
src/mysql/my.cnf: my.cnf
src/mysql/mysql.server: support-files/
sample.war: war/sample.war
mysql-connector-java-6.0.3.jar: lib/mysql-connector-java-6.0.3.jar
比如上面的sample.war(https://tomcat.apache.org/tomcat-7.0-doc/appdev/sample/),我们可以通过如下的方式来运行该应用:
我们的源码位于:https://github.com/liu-xiao-guo/tomcat-maven-webapp
更多关于snap的介绍,可以参阅文章"安装snap应用到Ubuntu 16.4桌面系统"(http://www.linuxdiyf.com/linux/22311.html)