
系统:Ubuntu
开发工具:eclipse
服务器:Tomcat8.0
JDK:1.8
准备:eclipse需要安装好maven插件,这里就不介绍了,不懂的可以取百度。
搭建流程:
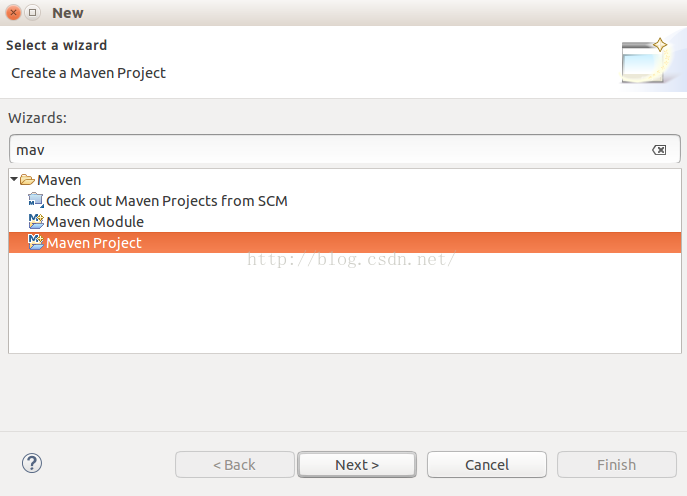
1.打开eclipse,在项目栏空白处右键 --> New --> Other... --> 选择“Maven Project” -->Next;
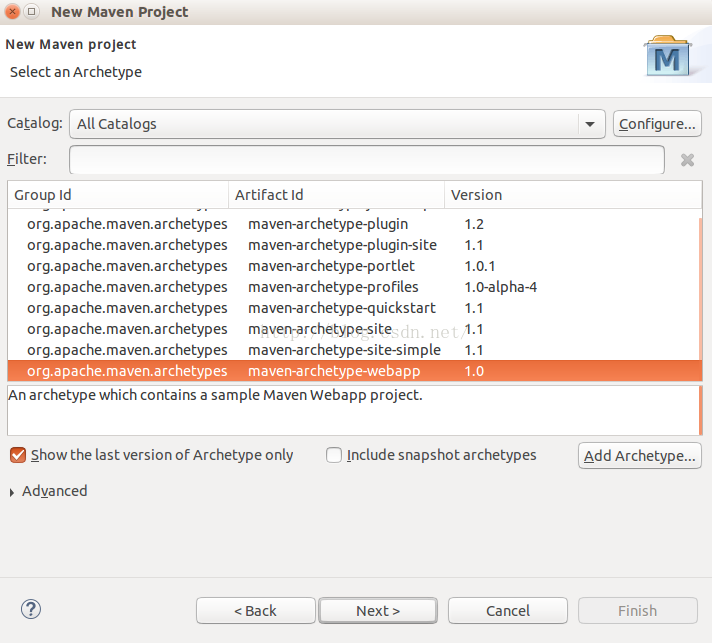
2.点击“Next” --> 选择“maven archetype-webapp” --> Next;
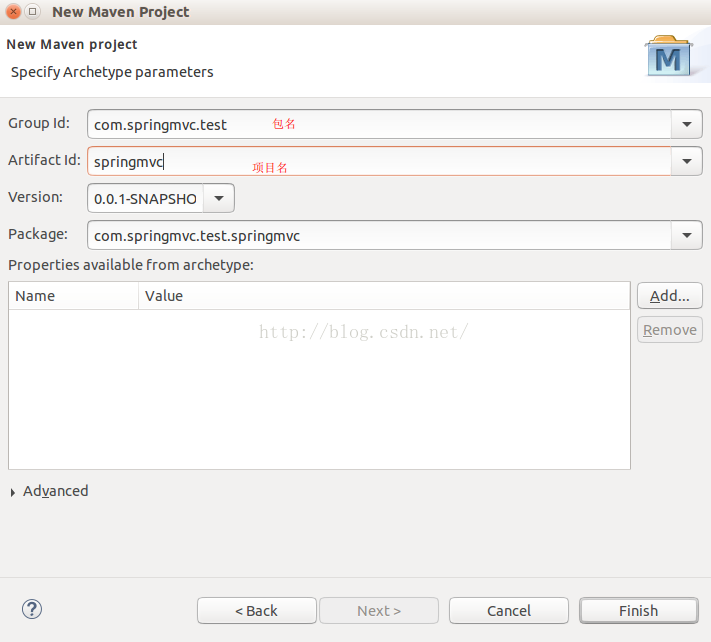
3.填写相应信息,然后点击“Finish”;
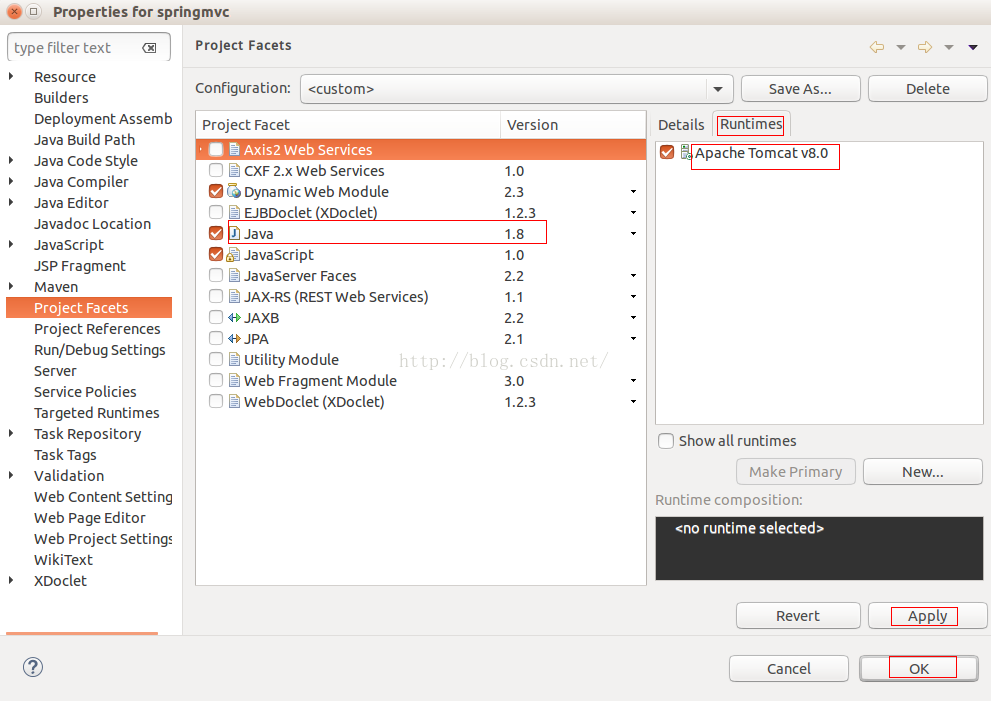
4.新建完项目,修改JDK版本和添加Tomcat服务器,则右键项目 --> Properties --> 选择“Project Facets” --> 将java版本改成相应的版本,我这里改成1.8 --> 点击“Runtimes” --> 在Tomcat前面打钩,选择服务器 --> 点击“Apply” --> OK;
到此,Maven的Java Web项目就建成了。
5.接下来,要对项目搭建spring框架。
首先,打开pom.xml文件,并进行配置,配置如下:
<project xmlns="http://maven.apache.org/POM/4.0.0" xmlns:xsi="http://www.w3.org/2001/XMLSchema-instance"
xsi:schemaLocation="http://maven.apache.org/POM/4.0.0 http://maven.apache.org/maven-v4_0_0.xsd">
<modelVersion>4.0.0</modelVersion>
<groupId>com.springmvc.test</groupId>
<artifactId>springmvc</artifactId>
<packaging>war</packaging>
<version>0.0.1-SNAPSHOT</version>
<name>springmvc Maven Webapp</name>
<url>http://maven.apache.org</url>
<dependencies>
<!-- junit测试包 -->
<dependency>
<groupId>junit</groupId>
<artifactId>junit</artifactId>
<version>3.8.1</version>
<scope>test</scope>
</dependency>
<!-- Spring -->
<dependency>
<groupId>org.springframework</groupId>
<artifactId>spring-context</artifactId>
<version>4.2.6.RELEASE</version>
</dependency>
<dependency>
<groupId>org.springframework</groupId>
<artifactId>spring-webmvc</artifactId>
<version>4.2.6.RELEASE</version>
</dependency>
<dependency>
<groupId>org.springframework</groupId>
<artifactId>spring-orm</artifactId>
<version>4.2.6.RELEASE</version>
</dependency>
<dependency>
<groupId>org.springframework</groupId>
<artifactId>spring-beans</artifactId>
<version>4.2.6.RELEASE</version>
</dependency>
<!-- 视图解析 -->
<dependency>
<groupId>jstl</groupId>
<artifactId>jstl</artifactId>
<version>1.2</version>
</dependency>
</dependencies>
<build>
<finalName>springmvc</finalName>
</build>
</project>
然后,在src/main/webapp/WEB-INF目录下新建springMVC-servlet.xml配置文件,即spring的配置文件;文件的内容如下:
<?xml version="1.0" encoding="UTF-8"?>
<beans xmlns="http://www.springframework.org/schema/beans"
xmlns:xsi="http://www.w3.org/2001/XMLSchema-instance"
xmlns:context="http://www.springframework.org/schema/context"
xmlns:jdbc="http://www.springframework.org/schema/jdbc"
xmlns:jee="http://www.springframework.org/schema/jee"
xmlns:tx="http://www.springframework.org/schema/tx"
xmlns:util="http://www.springframework.org/schema/util"
xmlns:task="http://www.springframework.org/schema/task"
xmlns:mvc="http://www.springframework.org/schema/mvc"
xsi:schemaLocation="http://www.springframework.org/schema/beans
http://www.springframework.org/schema/beans/spring-beans-4.0.xsd
http://www.springframework.org/schema/context
http://www.springframework.org/schema/context/spring-context-4.0.xsd
http://www.springframework.org/schema/jdbc
http://www.springframework.org/schema/jdbc/spring-jdbc-4.0.xsd
http://www.springframework.org/schema/jee
http://www.springframework.org/schema/jee/spring-jee-4.0.xsd
http://www.springframework.org/schema/tx
http://www.springframework.org/schema/tx/spring-tx-4.0.xsd
http://www.springframework.org/schema/util
http://www.springframework.org/schema/util/spring-util-4.0.xsd
http://www.springframework.org/schema/mvc
http://www.springframework.org/schema/mvc/spring-mvc-4.2.xsd
http://www.springframework.org/schema/task
http://www.springframework.org/schema/task/spring-task-4.0.xsd">
<context:component-scan base-package="com.springmvc.test" use-default-filters="false">
<context:include-filter type="annotation" expression="org.springframework.stereotype.Controller" />
</context:component-scan>
<!-- 该 BeanPostProcessor 将自动对标注 @Autowired 的 Bean 进行注入 -->
<bean class="org.springframework.beans.factory.annotation.AutowiredAnnotationBeanPostProcessor"/>
<bean class="org.springframework.web.servlet.view.UrlBasedViewResolver">
<property name="viewClass" value="org.springframework.web.servlet.view.JstlView" />
<property name="prefix">
<value>/WEB-INF/views/</value>
</property>
<property name="suffix">
<value>.jsp</value>
</property>
</bean>
</beans>
最后,配置src/main/webapp/WEB-INF目录下的web.xml文件;配置内容如下:
<web-app id="TuringdiDspBiz" version="2.4"
xmlns="http://java.sun.com/xml/ns/j2ee"
xmlns:xsi="http://www.w3.org/2001/XMLSchema-instance"
xsi:schemaLocation="http://java.sun.com/xml/ns/j2ee
http://java.sun.com/xml/ns/j2ee/web-app_2_4.xsd">
<display-name>Archetype Created Web Application</display-name>
<servlet>
<servlet-name>springMVC</servlet-name>
<servlet-class>org.springframework.web.servlet.DispatcherServlet</servlet-class>
<load-on-startup>1</load-on-startup>
</servlet>
<servlet-mapping>
<servlet-name>springMVC</servlet-name>
<url-pattern>/</url-pattern>
</servlet-mapping>
<servlet-mapping>
<servlet-name>springMVC</servlet-name>
<url-pattern>*.do</url-pattern>
</servlet-mapping>
<context-param>
<param-name>contextConfigLocation</param-name>
<param-value>/WEB-INF/springMVC-servlet.xml</param-value>
</context-param>
<listener>
<listener-class>org.springframework.web.context.ContextLoaderListener</listener-class>
</listener>
</web-app>
6.测试。
首先,在src/main/java/com/springmvc/test下建立HelloController.java文件;内容如下:
package com.springmvc.test;
import org.springframework.stereotype.Controller;
import org.springframework.ui.Model;
import org.springframework.web.bind.annotation.RequestMapping;
import org.springframework.web.bind.annotation.RequestParam;
@Controller
public class HelloController {
@RequestMapping("/hello")
public String hello(@RequestParam(value="name",required=false,defaultValue="world")String name,Model model){
model.addAttribute("name",name);
return "hello";
}
}
然后,在src/main/webapp/WEB-INF下创建views文件,并在该文件下创建hello.jsp文件;内容如下:
<%@ page language="java" contentType="text/html; charset=UTF-8"
pageEncoding="UTF-8"%>
<!DOCTYPE html PUBLIC "-//W3C//DTD HTML 4.01 Transitional//EN" "http://www.w3.org/TR/html4/loose.dtd">
<html>
<head>
<meta http-equiv="Content-Type" content="text/html; charset=UTF-8">
<title>Spring4 MVC -HelloWorld</title>
</head>
<body>
<h1>Hello : ${name}</h1>
</body>
</html>
最后,右键项目 --> Run As --> Run on Server --> Finish -->在浏览器地址栏输入“localhost:8080/springmvc/hello?name=user”;
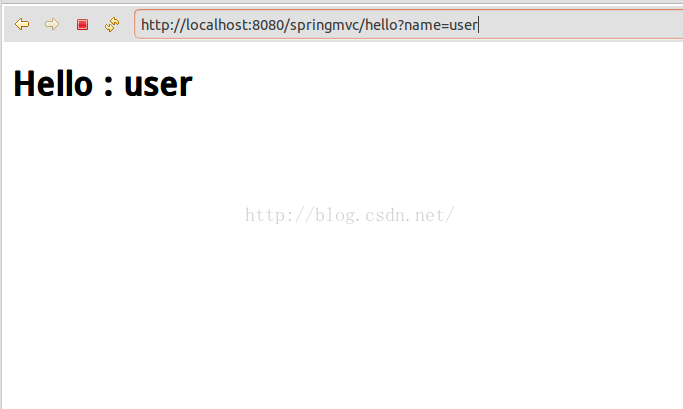
若能出现上图,则表示项目搭建成功!