
一、前提
新版基于ARM的Linux都会基于Device Tree去代替之前的device驱动。更加多的了解Device Tree可以访问宝哥的Bolg:ARM Linux 3.x的设备树(Device Tree)
这里只是举例在arch/arm/boot/dts中添加dtsi文件并在驱动中读取dtsi中节点信息,并将节点信息写入sys文件系统。
二、举例
1、添加dtsi文件
添加的dtsi文件可以基于你所用的手机或者开发板确定放入什么位置。dts总目录:arch/arm/boot/dts
例中dtsi所放位置位于:
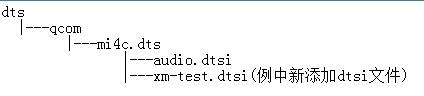
xm-test.dtsi:
/ {
xm-test {
compatible = "xiaomi,xm-test";
xm_test_tip;
};
};
其中xm-test、”xiaomi,xm-test”必须具有唯一性。
注:需要在audio.dtsi文件中添加#include “xm-test.dtsi”具体在哪个文件下添加include根据实际情况而定。
2、驱动
#include <linux/init.h>
#include <linux/module.h>
#include <linux/device.h>
#include <linux/platform_device.h>
#include <linux/sysfs.h>
#include <linux/slab.h>
#include <linux/kernel.h>
#include <linux/kobject.h>
#include <linux/string.h>
#include <linux/of.h>
#define HW_TEST "xm_test_tip"
#define i2c_info "xm_test, i2c_show"
static ssize_t show(struct device_driver *driver, char *buf)
{
if(NULL != buf)
{
/* Newline is not appended on purpose, for convenience of reader programs */
snprintf(buf, PAGE_SIZE, "%s\n", i2c_info);
return strlen(buf);
}
return 0;
}
DRIVER_ATTR(i2c_test, 0444, show, NULL);
static struct attribute *audio_attrs[] = {
&driver_attr_i2c_test.attr,
NULL,
};
static struct attribute_group audio_group = {
.name ="xm_test",
.attrs = audio_attrs,
};
static const struct attribute_group *groups[] = {
&audio_group,
NULL,
};
static int xm_test_probe(struct platform_device *pdev)
{
if(NULL == pdev)
{
printk( "xiaomi_test: xm_test_probe failed, pdev is NULL\n");
return 0;
}
if(NULL == pdev->dev.of_node)
{
printk( "xiaomi_test: xm_test_probe failed, of_node is NULL\n");
return 0;
}
/* 存在 xm_test_tip 就会在手机/开发板启动的时候打印出来 */
if(of_property_read_bool(pdev->dev.of_node, HW_TEST))
{
printk( "xm_test: %s is existing\n", HW_TEST);
}
printk("============== hanshubo ================\n");
return 0;
}
/* .compatible的信息要与dtsi中的compatible一致 */
static struct of_device_id audio_info_match_table[] = {
{ .compatible = "xiaomi,xm-test",},
{ },
};
static struct platform_driver xm_test = {
// device_driver
.driver = {
/* 这里的name不需要跟dtsi的节点xm-test一致 */
.name = "xm-test",
.of_match_table = audio_info_match_table,
.owner = THIS_MODULE,
.groups = groups,
},
.probe = xm_test_probe,
.remove = NULL,
};
static int __init audio_info_init(void)
{
return platform_driver_register(&xm_test);
}
static void __exit audio_info_exit(void)
{
platform_driver_unregister(&xm_test);
}
module_init(audio_info_init);
module_exit(audio_info_exit);
MODULE_LICENSE("GPL");
3、检验sys文件系统中的是否写入成功
在sys/bus/platform/drivers/xm_test中会找到文件i2c_test文件:
# cat i2c_test
# xm_test, i2c_show
OK,搞定了。
注:当使用设备树注册设备时,设备节点名称“xm-test”不必和platform_driver.driver.name 保持一致。
也就是说:总线不会通过此两项,将设备和驱动进行匹配。