
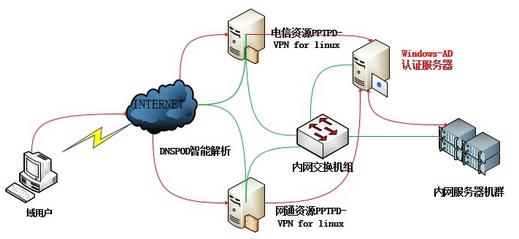
拓扑图:
注:以上图片上传到红联Linux系统教程频道中。
说明:首先公司内网环境需要有域的支持;
前端两台VPN服务器为Linux操作系统;
绿色线条表示网络环境的物理链路;
红色则表示认证的方式;
##当用户请求链接VPN时,使用域账号进行登录,由DNSPOD判断为电信还是联通(网通)资源,然后交给相应的vpn服务器,再由VPN内部的配置将用户请求指向AD。检查是否通过用户名和密码验证,通过后则可以正常登录使用。否则验证失败无法使用。
以下是单台vpn配置,双台配置相同。
1.配置系统相应环境并加入域:
1.1初始化环境
1)系统环境
[root@test-CentOS~]# cat /etc/RedHat-release
CentOSrelease 6.5 (Final)
2)关闭 SELINUX(不关闭会影响基于 Winbind 的用户验证)
#vim /etc/selinux/config
SELINUX=disabled
3)配置 DNS(这里 DNS 地址一定要配置 AD 的DNS,要不然会影响到后面的入域)
#vim /etc/resolv.conf
searchcorp.autohome.inc
nameserver10.168.0.104
4)开启 IP 包转发功能(默认是关闭的)
#vim /etc/sysctl.conf
#Controls IP packet forwarding
net.ipv4.ip_forward= 1
#sysctl -p
net.ipv4.ip_forward= 1
5)确定 linux 内核是否支持 iptables_nat 跟 PPP
[root@test-centos~]# modprobe iptable_nat
[root@test-centos~]# lsmod | grep iptable
iptable_nat 6158 1
nf_nat 22759 2 ipt_MASQUERADE,iptable_nat
nf_conntrack_ipv4 9506 4 iptable_nat,nf_nat
nf_conntrack 79758 5 ipt_MASQUERADE,iptable_nat,nf_nat,nf_conntrack_ipv4,xt_state
iptable_filter 2793 1
ip_tables 17831 2 iptable_nat,iptable_filter
[root@test-centos~]# dmesg | grep PPP
PPPgeneric driver version 2.4.2
6)同步时间(确保Linux服务器和域之间时差不要超过5分钟)
echo '*/5 * * * */usr/sbin/ntpdate time.windows.com >/dev/null 2>&1'>>/var/spool/cron/root
1.2相关组件安装
1)安装 epel 源
#rpm -ivhhttp://dl.Fedoraproject.org/pub/epel/6/x86_64/epel-release-6-8.noarch.rpm
#rpm --import /etc/pki/rpm-gpg/RPM-GPG-KEY-EPEL-6
2)安装 PPTP、Samba、hearbeat、Kerberos
#yum install pptpd ppp samba samba-common samba-client heartbeat krb5-libskrb5-workstation krb5-devel -y
1.3Samba和 Kerberos 配置
1)对samba配置文件进行如下更改:
[root@test-centos~]# cat /etc/samba/smb.conf |grep -v "^$"
[global]
# define the netbios name of the domain
workgroup = CORP
# define the pptp server netbios name
netbios name = test-centos
# server description
server string =pptpd server
# define the AD domain name
realm = CORP.AUTOHOME.INC
# printer stuff
printcap name = /etc/printcap
load printers = no
# log file stuff
log file = /var/log/samba/%m.log
max log size = 50
# must set to ads
security = ADS
# enable encrypt passwords
encrypt passwords = yes
# not to be a master browser
domain master = no
preferred master = no
# winbind stuff
idmap uid = 50001-550000
idmap gid = 50001-550000
winbind separator = +
winbind refresh tickets =yes
winbind use default domain= no
winbind enum users = yes
winbind enum groups = yes
template shell = /bin/bash
template homedir =/home/%D/%U
2)配置 Kerberos
[root@test-centos~]# cat /etc/krb5.conf
[logging]
default = FILE:/var/log/krb5libs.log
kdc = FILE:/var/log/krb5kdc.log
admin_server = FILE:/var/log/kadmind.log
[libdefaults]
default_realm = CORP.AUTOHOME.INC
dns_lookup_realm = false
dns_lookup_kdc = false
ticket_lifetime = 24h
renew_lifetime = 7d
forwardable = true
clockskew = 300
[realms]
CORP.AUTOHOME.INC = {
kdc =autohome-ad.corp.autohome.inc
admin_server = 10.168.0.104
}
corp.autohome.inc = {
kdc =autohome-ad.corp.autohome.inc
admin_server =autohome-ad.corp.autohome.inc
}
[domain_realm]
corp.autohome.inc = CORP.AUTOHOME.INC
.corp.autohome.inc =CORP.AUTOHOME.INC
[appdefaults]
pam = {
ticket_lifetime = 1d
renew_lifetime = 1d
forwardable = true
proxiable = false
retain_after_close = false
minimum_uid = 0
try_first_pass = true
}
3)测试 Kerberos(注意域名得大写)
[root@test-centos ~]# kinit-V administrator@CORP.AUTOHOME.INC
Usingdefault cache: /tmp/krb5cc_0
Usingprincipal: administrator@CORP.AUTOHOME.INC
Passwordfor administrator@CORP.AUTOHOME.INC:
Authenticatedto Kerberos v5
[root@test-centos ~]# klist
Ticketcache: FILE:/tmp/krb5cc_0
Defaultprincipal: administrator@CORP.AUTOHOME.INC
Validstarting Expires Service principal
02/27/1418:35:48 02/28/14 04:36:26 krbtgt/CORP.AUTOHOME.INC@CORP.AUTOHOME.INC
renew until 03/06/14 18:35:48
1.4加入CORP域并测试
1)加入corp域
[root@localhost samba]# netads join -U administrator@CORP.AUTOHOME.INC
Enteradministrator@CORP.AUTOHOME.INC's password:
Usingshort domain name -- CORP
Joined'PPTPD-VPN' to dns domain 'corp.autohome.inc'
NoDNS domain configured for pptpd-vpn. Unable to perform DNS Update.
DNSupdate failed!
2)开启服务并测试winbind
开启 samba、winbind 服务
#/etc/init.d/smb start
#/etc/init.d/nmb start
#/etc/init.d/winbind start
测试 winbind 是否工作正常
[root@test-centos~]# wbinfo –t #测试是否加入域
checkingthe trust secret for domain CORP via RPC calls succeeded
#wbinfo -g #读取域用户组信息
#wbinfo -u #读取域用户信息
#wbinfo -m #检测加入的域
BUILTIN
PPTPD-VPN
CORP
设置开机启动
#chkconfig winbind on
#chkconfig nmb on
#chkconfig smb on
2.pptpd设置
2.1 配置 /etc/pptpd.conf
[root@test-CentOS ~]# cat/etc/pptpd.conf |egrep -v "^#|^$"
ppp/usr/sbin/pppd
speed115200
option/etc/ppp/options.pptpd
debug
stimeout 30
localip10.168.0.219
remoteip10.0.0.2-253
pidfile/var/run/pptpd.pid
2.2 配置 /etc/ppp/options.pptpd
[root@test-centos~]# cat /etc/ppp/options.pptpd |egrep -v "^#|^$"
namepptpd
debug
logfile/var/log/pptpd.log
require-mschap-v2
ms-dns 10.168.0.104
ms-dns8.8.4.4
ms-wins10.168.0.104
ms-wins10.168.0.105
proxyarp
lock
nobsdcomp
nodeflate
nopcomp
noaccomp
novj
novjccomp
nologfd
nodefaultroute
pluginwinbind.so
ntlm_auth-helper"/usr/bin/ntlm_auth --helper-protocol=ntlm-server-1 "
2.3 额外配置 MTU(适合那些 XP 系统)
[root@test-centos~]# cat /etc/ppp/ip-up
#!/bin/bash
#This file should not be modified -- make local changes to
#/etc/ppp/ip-up.local instead
PATH=/sbin:/usr/sbin:/bin:/usr/bin
exportPATH
LOGDEVICE=$6
REALDEVICE=$1
[-f /etc/sysconfig/network-scripts/ifcfg-${LOGDEVICE} ] &&/etc/sysconfig/network-scripts/ifup-post --realdevice ${REALDEVICE}ifcfg-${LOGDEVICE}
/etc/ppp/ip-up.ipv6to4${LOGDEVICE}
[-x /etc/ppp/ip-up.local ] && /etc/ppp/ip-up.local "$@"
/sbin/ifconfig $1 mtu 14000
exit0
3.IPTABLES防火墙设置
3.1先执行以下命令:
Iptables -F
Iptables -X
Iptables -Z
iptables-P FORWARD ACCEP
3.2Iptables 规则如下:
-AINPUT -p tcp -m tcp --dport 80 -j ACCEPT
-AINPUT -p tcp -m tcp --dport 389 -j ACCEPT
-AINPUT -p tcp -m tcp --dport 1723 -j ACCEPT
-AINPUT -p tcp -m tcp --dport 47 -j ACCEPT
-AINPUT -i lo -j ACCEPT
-AINPUT -s 10.168.0.0/24 -j ACCEPT
-AINPUT -s 10.168.9.0/24 -j ACCEPT
-AINPUT -m state --state RELATED,ESTABLISHED -j ACCEPT
-AFORWARD -i eth4 -j ACCEPT
-AFORWARD -o eth4 -j ACCEPT
3.3NAT设置如下:
Iptables-t nat -A POSTROUTING -s 10.0.0.0/24 -o eth4 -j MASQUERADE
Iptables-t nat -A POSTROUTING -s 10.0.0.0/24 -j SNAT --to-source 117.251.201.25
###注,eth4为内网网卡,eth5为外网网卡(即:117.251.201.25的网卡)
注:最后在客户端建立拨号连接,并将地址制定到VPN的外网IP地址进行拨号。