
在网络服务中,web服务在人们生活中是必不可少的;人们每天在网站上浏览网页,获取最新的讯息,作为一个交互平台web服务是如何实现的呢?当然离不了我们的网站服务器,学了两天,有一些心得分享给大家!
1,基于apache的web服务器基础搭建:
(1)实验环境:一台ip为192.168.10.10的rhel5.9主机作为web服务器,一台ip为192.168.10.15的win7主机作为测试机
(2)查看服务主机软件是否安装
[root@ser1 ~]# rpm -q httpd httpd-manual httpd-devel
package httpd is not installed
package httpd-manual is not installed
package httpd-devel is not installed
(3)安装软件包
[root@ser1 ~]# yum install -y httpd httpd-manual httpd-devel
(4)启动服务
[root@ser1 ~]# service httpd start
启动httpd: [确定]
[root@ser1 ~]# chkconfig httpd on
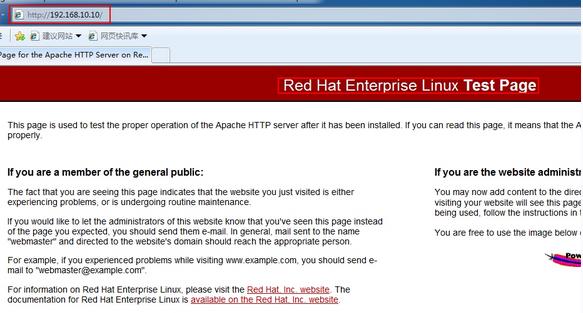
(5)在win7上测试,无网页缺省下显示红帽测试页
<报错页面存放位置/var/www/error/noindex.html>
(6)打开配置文件
[root@ser1 ~]# vim /etc/httpd/conf/httpd.conf
可获得以下重要字段:
目录设置:
<Directory 目录> .. .. </Directory>
访问位置设置:
<LocationURL> .. .. </Location>
虚拟主机设置:
<VirtualHost 监听地址> .. .. </VirtualHost>
常用的全局设置参数:
ServerName本站点的FQDN名称
DocumentRoot网页文档的根目录:缺省/var/www/html/
DirectoryIndex默认索引页/首页文件:一般设为index.html index.php
ErrorLog错误日志文件的位置
CustomLog 访问日志文件的位置
Listen 监听服务的IP地址、端口号
ServerRoot 服务目录:/etc/httpd/
Timeout网络连接超时,默认 300 秒
KeepAlive是否保持连接,可选On或Off
MaxKeepAliveRequests每次连接最多处理的请求数
KeepAliveTimeout保持连接的超时时限
Include 可包含其他子配置文件: /etc/httpd/conf.d/
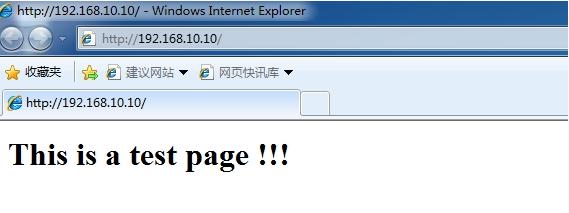
(7)创建测试网页
[root@ser1 ~]# vim /var/www/html/index.html
<h1>
This is a test page !!!
</h1>
~
(8)win7下测试,主页变为测试网页
2,基于apache的web服务器的访问控制:
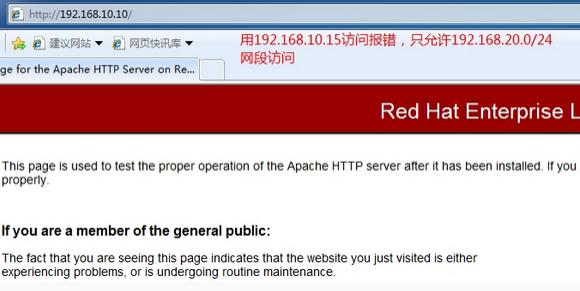
(1)web服务的地址限制
I,rder 配置项,定义控制顺序
allow,deny 先允许后拒绝,缺省拒绝所有;冲突时,拒绝生效;allow不设置,拒绝所有
deny,allow 先拒绝后允许,缺省允许所有;冲突时,允许生效;deny不设置,允许所有
II,Allow/Deny from 配置项,设置权限
Allow from 地址1 地址2 .. ..
Deny from 地址1 地址2 .. ..
配置如下:
[root@ser1 ~]# vim /etc/httpd/conf/httpd.conf
331 #
332 Orderallow,deny
333 Allowfrom 192.168.20.0/24
334
335 </Directory>
[root@ser1 ~]# service httpd restart……重启服务
停止httpd: [确定]
启动httpd: [确定]
在win7上测试,测试完成并还原配置文件:
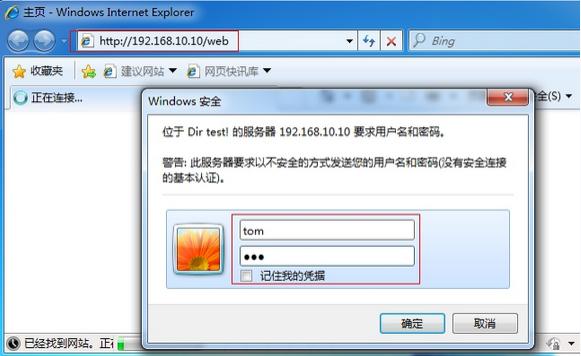
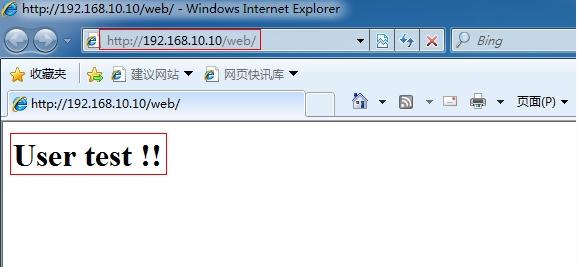
(2)网站目录的用户访问控制
配置如下:
[root@ser1 ~]# mkdir -p /var/www/html/web……建立测试目录
[root@ser1 ~]# vim /var/www/html/web/index.html……建立测试网页,网页内容:User test !!
[root@ser1 ~]# htpasswd -c/etc/httpd/auth.ulisttom……建立测试用户
New password:
Re-type new password:
Adding password for user tom
[root@ser1 ~]# vim /etc/httpd/conf/httpd.conf……修改配置文件
……
<Directory "/var/www/html/web">……配置文件底端追加内容
AuthName"Dir test!"
AuthTypebasic
AuthUserFile /etc/httpd/auth.ulist
Requirevalid-user
</Directory>
[root@ser1 ~]# !se……重启服务
service httpd restart
停止httpd: [确定]
启动httpd: [确定]
测试:
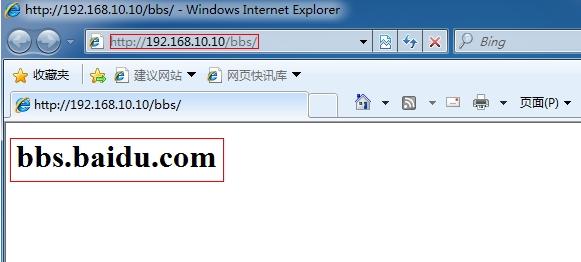
3, 基于apache的web服务器的目录别名配置:
(1)建立目录
[root@ser1 ~]# mkdir -p /var/www/html/baidu/bbs
(2)在新目录下建立网页
[root@ser1 web]# vim index.html
<h1>
bbs.baidu.com
</h1>
(3)设置目录别名
[root@ser1 conf]# vim httpd.conf
Requirevalid-user
</Directory>
Alias /bbs"/var/www/html/baidu/bbs"……bbs格式前后一致如:bbs-bbs bbs/-bbs/
[root@ser1 conf]# !se……重启服务
service httpd restart
停止httpd: [确定]
启动httpd: [确定]
(4)验证
4, web服务器的虚拟主机配置:
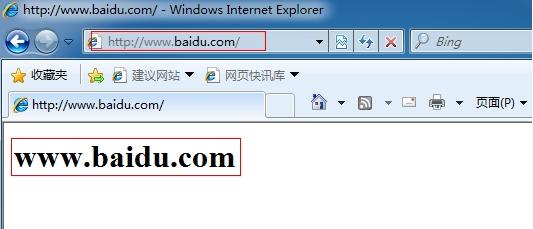
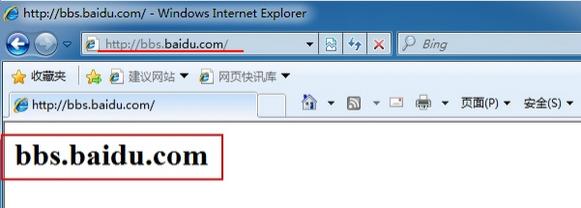
(1)基于域名的虚拟主机[DNS设置所有地址解析为同一IP,最常用]
建立www.baidu.com和bbs.baidu.com两个网页:
[root@ser1 www]# vim index.html
[root@ser1 www]# cd ../bbs/
[root@ser1 bbs]# vim index.html
[root@ser1 bbs]# pwd
/data/bbs
在web服务器上配置DNS 服务器,把www.baidu.com和bbs.baidu.com解析到192.168.10.10:
$TTL 86400
@ IN SOA baidu.com. root.baidu.com. (
2014030901 ; Serial
28800 ; Refresh
14400 ; Retry
3600000 ; Expire
86400) ; Minimum
IN NS dns1.baidu.com.
dns1 IN A 192.168.10.10
www IN A 192.168.10.10
bbs IN A 192.168.10.10
添加虚拟主机配置文件:
[root@ser1 ~]# vim /etc/httpd/conf.d/vhosts.conf
NameVirtualHost *:80
2<VirtualHost *:80>
3 DocumentRoot /data/www
4 ServerName www.baidu.com
5 ErrorLog logs/www.baidu.com-error_log
6 CustomLog logs/www.baidu.com-access_logcommon
7</VirtualHost>
8<VirtualHost *:80>
9 DocumentRoot /data/bbs
10 ServerName bbs.baidu.com
11 ErrorLog logs/bbs.baidu.com-error_log
12 CustomLog logs/bbs.baidu.com-access_logcommon
13</VirtualHost>
[root@ser1 ~]# service httpd restart……重启服务
停止httpd: [确定]
启动httpd: [确定]
验证:
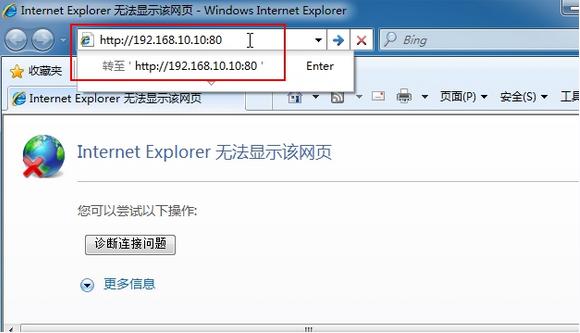
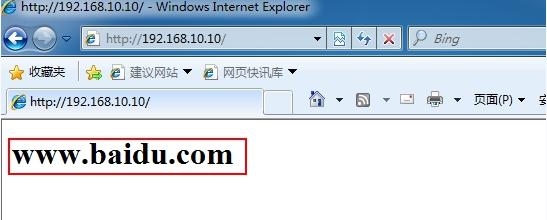
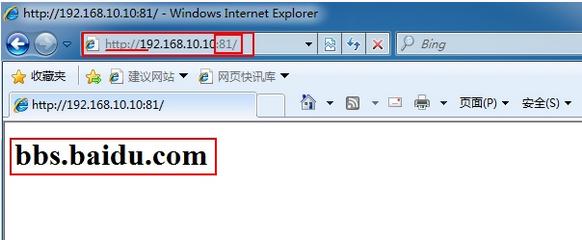
(2)基于端口的虚拟主机[无需配置DNS直接指定端口,访问不同端口获取不同网页;用于内部机测试网站]
修改虚拟主机配置文件:
[root@ser1 ~]# vim /etc/httpd/conf.d/vhosts.conf
#NameVirtualHost *:80……不需要NameVirtualHost和NameServer
<VirtualHost 192.168.10.10:80>
DocumentRoot /data/www
ErrorLoglogs/dk-www.baidu.com-error_log
CustomLoglogs/dk-www.baidu.com-access_log common
</VirtualHost>
<VirtualHost 192.168.10.10:81>
DocumentRoot /data/bbs
ErrorLoglogs/dk-bbs.baidu.com-error_log
CustomLoglogs/dk-bbs.baidu.com-access_log common
</VirtualHost>
~
修改web配置文件,侦听81端口:
[root@ser1 ~]# vim /etc/httpd/conf/httpd.conf
#Listen 12.34.56.78:80
Listen 80
Listen 81
验证:
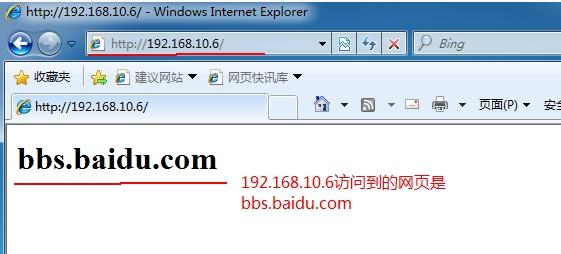
(3)基于ip地址的虚拟主机[很少使用]
在主机上虚拟一块网卡:
[root@ser1 ~]# ifconfig eth0:0 192.168.10.6
修改DNS解析文件:
$TTL 86400
@ IN SOA baidu.com. root.baidu.com. (
2014030901 ; Serial
28800 ; Refresh
14400 ; Retry
3600000 ; Expire
86400) ; Minimum
IN NS dns1.baidu.com.
dns1 IN A 192.168.10.10
www IN A 192.168.10.10
bbs IN A 192.168.10.6
修改虚拟主机配置文件:
[root@ser1 ~]# vim /etc/httpd/conf.d/vhosts.conf
#NameVirtualHost *:80……不需要NameVirtualHost
<VirtualHost 192.168.10.10:80>
DocumentRoot /data/www
ServerNamewww.baidu.com
ErrorLoglogs/ip-www.baidu.com-error_log
CustomLoglogs/ip-www.baidu.com-access_log common
</VirtualHost>
<VirtualHost 192.168.10.6:80>
DocumentRoot /data/bbs
ServerNamebbs.baidu.com
ErrorLoglogs/ip-bbs.baidu.com-error_log
CustomLoglogs/ip-bbs.baidu.com-access_log common
</VirtualHost>
[root@ser1 ~]# service httpd restart……重启服务
停止httpd: [确定]
启动httpd: [确定]
验证:

5,web服务的AWstats日志分析:
(1)安装awstats软件
[root@ser1 Desktop]# tar -zxvf awstats-7.1.tar.gz -C/usr/local/
[root@ser1 Desktop]# cd /usr/local/
[root@ser1 local]# mv awstats-7.1 awstats
[root@ser1 local]# cd awstats/
[root@ser1 awstats]# cd tools/
[root@ser1 tools]# ./awstats_configure.pl……安装软件
Config file path ('none' to skip web server setup):
> /etc/httpd/conf/httpd.conf……输入web服务配置文件位置
Do you want me to build a new AWStats config/profile
file (required if first install) [y/N] ? y
Your web site, virtual server or profile name:
> www.baidu.com......输入监控的网站
Default: /etc/awstats
Directory path to store config file(s) (Enter fordefault):
>……Enter进入下一步
(2)配置AWstats文件
[root@ser1 tools]# vim/etc/awstats/awstats.www.baidu.com.conf
LogFile="/var/log/httpd/access_log"......导入网站访问日志
DirData="var/lib/awstats"......指定软件工作目录
(3)创建awstats工作目录
[root@ser1 tools]# mkdir /var/lib/awstats
(4)更新站点记录
[root@ser1 tools]# ./awstats_updateall.pl now
(5)添加计划任务
[root@ser1 ~]# crontab -e
*/5 * * * */usr/local/awstats/tools/awstats_updateall.pl now
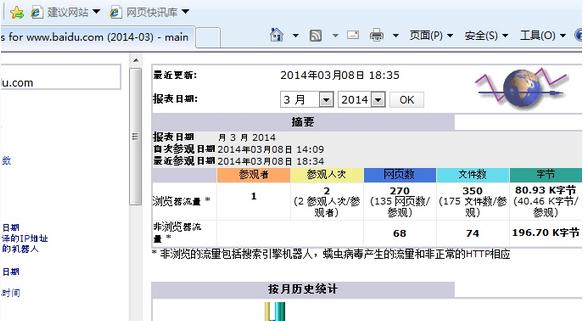
(6)查看分析结果

(7)设计网页跳转,简化网络输入地址
[root@ser1 ~]# vim /var/www/html/sta.html
<html><head>
<meta http-equiv=refreshcontent="0;url=http://192.168.10.10/awstats/awstats.pl?config=www.baidu.com">
</head>
<body>
</body>
</html>
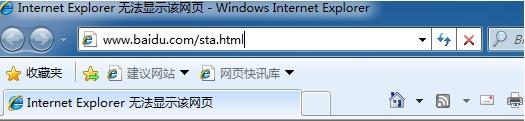
(8)测试:在浏览器输入www.baidu.com/sta.html
此步可能不成功,原因是:当设置完虚拟主机,网页文档的根目录(DocumentRoot)变为/data/{www,bbs},而我们建立的网页文件的根目录是在/var/www/html,所以要保证试验成功:I,把sta.html文件移动到www或者bbs目录下;II,把虚拟主机文件后缀改为bak[实际运用中采用第一种方法,直接把跳转网页放在定义的网页文件根目录下]
注:以上图片上传到红联Linux系统教程频道中。