
本文主要介绍了LAMP的安装。
Linux+Apache+Mysql/MariaDB+Perl/PHP/Python一组常用来搭建动态网站或者服务器的开源软件,本身都是各自独立的程序,但是因为常被放在一起使用,拥有了越来越高的兼容度,共同组成了一个强大的Web应用程序平台
本文所用环境和安装包为CentOS6.5+httpd 2.4.6+mysql-5.5.33+php-5.4.19+xcache-3.0.3。
一、编译安装apache
1、解决依赖关系
httpd-2.4.6需要较新版本的apr和apr-util,因此需要事先对其进行升级。升级方式有两种,一种是通过源代码编译安装,一种是直接升级rpm包。这里选择使用编译源代码的方式进行。
(1) 编译安装apr
# tar xf apr-1.4.6.tar.bz2
# cd apr-1.4.6
# ./configure --prefix=/usr/local/apr
# make && make install
(2) 编译安装apr-util
# tar xf apr-util-1.5.2.tar.bz2
# cd apr-util-1.5.2
# ./configure --prefix=/usr/local/apr-util --with-apr=/usr/local/apr
# make && make install
(3) httpd-2.4.6编译过程也要依赖于pcre-devel软件包,需要事先安装。此软件包系统光盘自带,因此,找到并安装即可。
参考命令:
#yum install -y pcre-devel
2、编译安装httpd-2.4.6
首先下载httpd-2.4.6到本地
# tar xf httpd-2.4.6.tar.bz2
# cd httpd-2.4.6
# ./configure --prefix=/usr/local/apache --sysconfdir=/etc/httpd --enable-so --enable-ssl --enable-cgi --enable-rewrite --with-zlib --with-pcre --with-apr=/usr/local/apr --with-apr-util=/usr/local/apr-util --enable-modules=most --enable-mpms-shared=all --with-mpm=event
# make && make install
3、修改httpd的主配置文件,设置其Pid文件的路径
编辑/etc/httpd/httpd.conf,添加如下行即可:
PidFile "/var/run/httpd.pid"
4、提供SysV服务脚本/etc/rc.d/init.d/httpd,内容如下:
#!/bin/bash
#
# httpdStartup script for the Apache HTTP Server
#
# chkconfig: - 85 15
# description: Apache is a World Wide Web server. It is used to serve \
#HTML files and CGI.
# processname: httpd
# config: /etc/httpd/conf/httpd.conf
# config: /etc/sysconfig/httpd
# pidfile: /var/run/httpd.pid
# Source function library.
. /etc/rc.d/init.d/functions
if [ -f /etc/sysconfig/httpd ]; then
. /etc/sysconfig/httpd
fi
# Start httpd in the C locale by default.
HTTPD_LANG=${HTTPD_LANG-"C"}
# This will prevent initlog from swallowing up a pass-phrase prompt if
# mod_ssl needs a pass-phrase from the user.
INITLOG_ARGS=""
# Set HTTPD=/usr/sbin/httpd.worker in /etc/sysconfig/httpd to use a server
# with the thread-based "worker" MPM; BE WARNED that some modules may not
# work correctly with a thread-based MPM; notably PHP will refuse to start.
# Path to the apachectl script, server binary, and short-form for messages.
apachectl=/usr/local/apache/bin/apachectl
httpd=${HTTPD-/usr/local/apache/bin/httpd}
prog=httpd
pidfile=${PIDFILE-/var/run/httpd.pid}
lockfile=${LOCKFILE-/var/lock/subsys/httpd}
RETVAL=0
start() {
echo -n $"Starting $prog: "
LANG=$HTTPD_LANG daemon --pidfile=${pidfile} $httpd $OPTIONS
RETVAL=$?
echo
[ $RETVAL = 0 ] && touch ${lockfile}
return $RETVAL
}
stop() {
echo -n $"Stopping $prog: "
killproc -p ${pidfile} -d 10 $httpd
RETVAL=$?
echo
[ $RETVAL = 0 ] && rm -f ${lockfile} ${pidfile}
}
reload() {
echo -n $"Reloading $prog: "
if ! LANG=$HTTPD_LANG $httpd $OPTIONS -t >&/dev/null; then
RETVAL=$?
echo $"not reloading due to configuration syntax error"
failure $"not reloading $httpd due to configuration syntax error"
else
killproc -p ${pidfile} $httpd -HUP
RETVAL=$?
fi
echo
}
# See how we were called.
case "$1" in
start)
start
;;
stop)
stop
;;
status)
status -p ${pidfile} $httpd
RETVAL=$?
;;
restart)
stop
start
;;
condrestart)
if [ -f ${pidfile} ] ; then
stop
start
fi
;;
reload)
reload
;;
graceful|help|configtest|fullstatus)
$apachectl $@
RETVAL=$?
;;
*)
echo $"Usage: $prog {start|stop|restart|condrestart|reload|status|fullstatus|graceful|help|configtest}"
exit 1
esac
exit $RETVAL
而后为此脚本赋予执行权限:
# chmod +x /etc/rc.d/init.d/httpd
加入服务列表:
# chkconfig --add httpd
接下来就可以启动服务进行测试了。
#service httpd start
打开浏览器访问ip地址即可看到:

二、安装mysql-5.5.33
1、准备数据存放的文件系统
新建一个逻辑卷,并将其挂载至特定目录即可。这里不再给出过程。
这里假设其逻辑卷的挂载目录为/mydata,而后需要创建/mydata/data目录做为mysql数据的存放目录。
2、新建用户以安全方式运行进程:
# groupadd -r mysql
# useradd -g mysql -r -s /sbin/nologin -M -d /mydata/data mysql
# chown -R mysql:mysql /mydata/data
3、安装并初始化mysql-5.5.33
首先下载平台对应的mysql版本至本地,这里是64位平台,因此,选择的为mysql-5.5.33-linux2.6-x86_64.tar.gz。
# tar xf mysql-5.5.33-linux2.6-x86_64.tar.gz -C /usr/local
# cd /usr/local/
# ln -sv mysql-5.5.33-linux2.6-x86_64 mysql
# cd mysql
# chown -R mysql:mysql .
# scripts/mysql_install_db --user=mysql --datadir=/mydata/data
# chown -R root .
4、为mysql提供主配置文件:
# cd /usr/local/mysql
# cp support-files/my-large.cnf /etc/my.cnf
并修改此文件中thread_concurrency的值为你的CPU个数乘以2,比如这里使用如下行:
thread_concurrency = 4
另外还需要添加如下行指定mysql数据文件的存放位置:
datadir = /mydata/data
5、为mysql提供sysv服务脚本:
# cd /usr/local/mysql
# cp support-files/mysql.server /etc/rc.d/init.d/mysqld
# chmod +x /etc/rc.d/init.d/mysqld
添加至服务列表:
# chkconfig --add mysqld
# chkconfig mysqld on
6.在/etc/profile.d下创建mysql.sh,并修改内容:
export PATH=/usr/local/mysql/bin:$PATH

为了使用mysql的安装符合系统使用规范,并将其开发组件导出给系统使用,这里还需要进行如下步骤:
7、输出mysql的man手册至man命令的查找路径:
编辑/etc/man.config,添加如下行即可:
MANPATH /usr/local/mysql/man
8、输出mysql的头文件至系统头文件路径/usr/include:
这可以通过简单的创建链接实现:
# ln -sv /usr/local/mysql/include /usr/include/mysql
9、输出mysql的库文件给系统库查找路径:
# echo '/usr/local/mysql/lib' > /etc/ld.so.conf.d/mysql.conf
而后让系统重新载入系统库:
# ldconfig
三、编译安装php-5.4.19
1、解决依赖关系:
# yum install libxml2
# yum install libxml2-devel -y
2、编译安装php-5.4.19
首先下载源码包至本地目录。
# tar xf php-5.4.19.tar.bz2
# cd php-5.4.19
# ./configure --prefix=/usr/local/php --with-mysql=/usr/local/mysql --with-openssl --with-mysqli=/usr/local/mysql/bin/mysql_config --enable-mbstring --with-freetype-dir --with-jpeg-dir --with-png-dir --with-zlib --with-libxml-dir=/usr --enable-xml --enable-sockets --with-apxs2=/usr/local/apache/bin/apxs --with-mcrypt --with-config-file-path=/etc --with-config-file-scan-dir=/etc/php.d --with-bz2 --enable-maintainer-zts
说明:
1、这里为了支持apache的worker或event这两个MPM,编译时使用了--enable-maintainer-zts选项。
2、如果使用PHP5.3以上版本,为了链接MySQL数据库,可以指定mysqlnd,这样在本机就不需要先安装MySQL或MySQL开发包了。mysqlnd从php 5.3开始可用,可以编译时绑定到它(而不用和具体的MySQL客户端库绑定形成依赖),但从PHP 5.4开始它就是默认设置了。命令为:
# ./configure --with-mysql=mysqlnd --with-pdo-mysql=mysqlnd --with-mysqli=mysqlnd
接着开始安装:
# make
# make test
# make intall
为php提供配置文件:
# cp php.ini-production /etc/php.ini
3、编辑apache配置文件httpd.conf,以apache支持php
# vim /etc/httpd/httpd.conf
1、添加如下二行
AddType application/x-httpd-php .php
AddType application/x-httpd-php-source .phps
2、定位至DirectoryIndex index.html
修改为:
DirectoryIndex index.php index.html
而后重新启动httpd,或让其重新载入配置文件即可测试php是否已经可以正常使用。
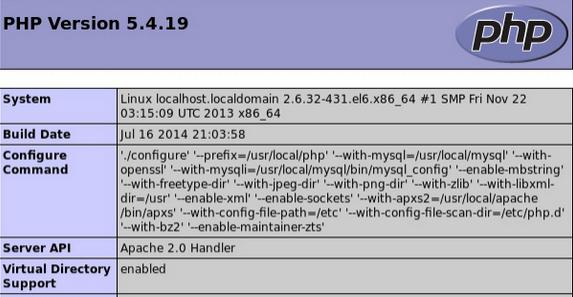
4.测试,在/usr/local/apache/htdocs下创建index.php文件,内容如下:
<?php
phpinfo();
?>
从浏览器打开测试页如下:
四、安装xcache,为php加速:
1、安装
# tar xf xcache-3.0.3.tar.gz
# cd xcache-3.0.3
# /usr/local/php/bin/phpize
# ./configure --enable-xcache --with-php-config=/usr/local/php/bin/php-config
# make && make install
安装结束时,会出现类似如下行:
Installing shared extensions:/usr/local/php/lib/php/extensions/no-debug-zts-20100525/
2、编辑php.ini,整合php和xcache:
首先将xcache提供的样例配置导入php.ini
# mkdir /etc/php.d
# cp xcache.ini /etc/php.d
说明:xcache.ini文件在xcache的源码目录中。
接下来编辑/etc/php.d/xcache.ini,找到extension开头的行,修改为如下行:
extension = /usr/local/php/lib/php/extensions/no-debug-zts-20100525/xcache.so
3.测试,此时刷新之前的测试页,可以在其中找到xcache选项

附:配置fpm方式的php:
1、编译安装php-5.4.19
# tar xf php-5.4.19.tar.bz2
# cd php-5.4.19
# ./configure --prefix=/usr/local/php --with-mysql=/usr/local/mysql --with-openssl --with-mysqli=/usr/local/mysql/bin/mysql_config --enable-mbstring --with-freetype-dir --with-jpeg-dir --with-png-dir --with-zlib --with-libxml-dir=/usr --enable-xml --enable-sockets --enable-fpm --with-mcrypt --with-config-file-path=/etc --with-config-file-scan-dir=/etc/php.d --with-bz2
为php提供配置文件:
# cp php.ini-production /etc/php.ini
2、配置php-fpm
为php-fpm提供Sysv init脚本,并将其添加至服务列表:
# cp sapi/fpm/init.d.php-fpm /etc/rc.d/init.d/php-fpm
# chmod +x /etc/rc.d/init.d/php-fpm
# chkconfig --add php-fpm
# chkconfig php-fpm on
为php-fpm提供配置文件:
# cp /usr/local/php/etc/php-fpm.conf.default /usr/local/php/etc/php-fpm.conf
编辑php-fpm的配置文件:
# vim /usr/local/php/etc/php-fpm.conf
配置fpm的相关选项为你所需要的值,并启用pid文件(如下最后一行):
pm.max_children = 50
pm.start_servers = 5
pm.min_spare_servers = 2
pm.max_spare_servers = 8
pid = /usr/local/php/var/run/php-fpm.pid
接下来就可以启动php-fpm了:
# service php-fpm start
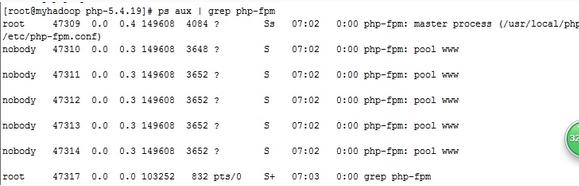
可以使用如下命令来验正(如果此命令输出有中几个php-fpm进程就说明启动成功了):
# ps aux | grep php-fpm
效果如下:
注:以上图片上传到红联Linux系统教程频道中。