
首先你得确定你已经正常安装好NVIDIA显卡驱动、CUDA8.0以上
按照课程目前是体验TensorRT,TensorRT是一个比CAFFE轻量级的CUDA开发框架,
主要用于嵌入式系统,因为CAFFE比较庞大不适于嵌入式,因此可以在CAFFE上训练,
在TensorRT上使用,而 jetson-inference 主要是用于jetson TX1/TX2平台上的,
如果直接安装会出现如下错误
In file included from /home/ubuntu/Downloads/jetson-inference/imageNet.h:9:0,
from /home/ubuntu/Downloads/jetson-inference/imageNet.cpp:5:
/home/ubuntu/Downloads/jetson-inference/tensorNet.h:9:21: fatal error: NvInfer.h: No such file or directory
#include "NvInfer.h"
^
compilation terminated.
make[2]: *** [CMakeFiles/jetson-inference.dir/imageNet.cpp.o] Error 1
make[1]: *** [CMakeFiles/jetson-inference.dir/all] Error 2
make: *** [all] Error 2
根据 https://github.com/dusty-nv/jetson-inference/issues/14 的说明应该要安装NVIDIA的tensorrt
所以先去 https://developer.nvidia.com/tensorrt 这里下载TensorRT2
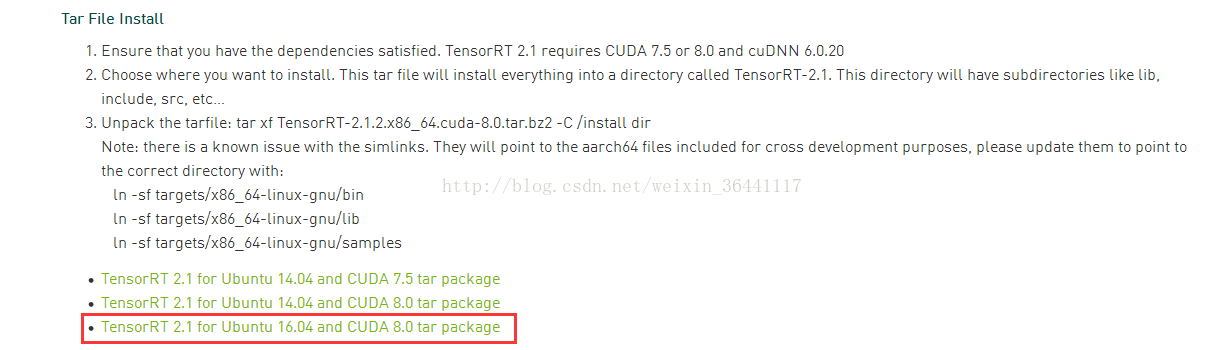
下载之后解开 tar包,会发现里面有bin、include、lib ...等等目录,
$ sudo cp bin/* /usr/bin
$ sudo cp include/* /usr/local/include/
$ sudo cp lib/* /usr/lib/
分别把这三个目录下的文件复制到系统对应的目录下
再来后面会遇到找不到qconfig.h 之后的文件,这个是因为QT安装完后没有把相关目录放到编译器的头文件目录里,
所以编辑 ~/.bashrc文件
在最后面加上
export CPLUS_INCLUDE_PATH=$CPLUS_INCLUDE_PATH:/usr/lib/x86_64-Linux-gnu/gstreamer-1.0/include
保存并且执行
$ source ~/.bashrc
使用下面命令来下载jetson-inference源码
$ git clone https://github.com/dusty-nv/jetson-inference
$ cd jetson-inference
$ mkdir build
并且编辑 CMakePreBuild.sh 文件其中有些地方是下载神经网络文件及训练好的参数的,
这个部分请先屏蔽,因为在国内你访问不到会产生报错,
当然如果你可以访问到就不需要了,
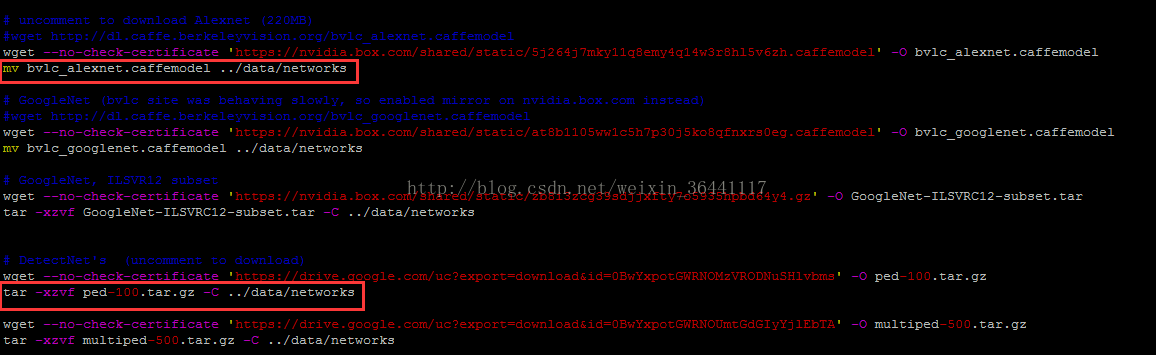
大致上就是类似上图这些都是,我红框框起来的是说下载完之后要干的事,反正想办法把这些不存在的文件得到后,按他下面的命令执行,有的是复制到某些目录,
有些可能是让你解压缩,总之这些文件也是必要的
再来因为jetson-inference默认是用在 TX1 / TX2平台上的,所以后面会遇到一个错误如下
[GIE] attempting to open cache file networks/bvlc_googlenet.caffemodel.2.tensorcache
[GIE] loading network profile from cache... networks/bvlc_googlenet.caffemodel.2.tensorcache
[GIE] platform does not have FP16 support.
[GIE] networks/bvlc_googlenet.caffemodel loaded
[GIE] CUDA engine context initialized with 2 bindings
[GIE] networks/bvlc_googlenet.caffemodel input binding index: 0
[GIE] networks/bvlc_googlenet.caffemodel input dims (b=2 c=3 h=224 w=224) size=1204224
[cuda] cudaAllocMapped 1204224 bytes, CPU 0x1020d000000 GPU 0x1020d000000
[GIE] networks/bvlc_googlenet.caffemodel output 0 prob binding index: 1
[GIE] networks/bvlc_googlenet.caffemodel output 0 prob dims (b=2 c=1000 h=1 w=1) size=8000
[cuda] cudaAllocMapped 8000 bytes, CPU 0x1020d200000 GPU 0x1020d200000
networks/bvlc_googlenet.caffemodel initialized.
[GIE] googlenet loaded
imageNet -- loaded 1000 class info entries
googlenet initialized.
loaded image orange_0.jpg (1920 x 1920) 58982400 bytes
[cuda] cudaAllocMapped 58982400 bytes, CPU 0x1020d400000 GPU 0x1020d400000
[cuda] cudaGetLastError()
[cuda] invalid device function (error 8) (hex 0x08)
[cuda] /home/monster/Desktop/jetson/jetson-inference/imageNet.cu:97
[cuda] cudaPreImageNetMean((float4*)rgba, width, height, mInputCUDA, mWidth, mHeight, make_float3(104.0069879317889f, 116.66876761696767f, 122.6789143406786f))
[cuda] invalid device function (error 8) (hex 0x08)
[cuda] /home/monster/Desktop/jetson/jetson-inference/imageNet.cpp:184
imageNet::Classify() -- cudaPreImageNetMean failed
imagenet-console: failed to classify 'orange_0.jpg' (result=-1)
shutting down...`
解决办法如下,先用下面命令查询
$ /usr/local/cuda-8.0/samples/1_Utilities/deviceQuery/deviceQuery
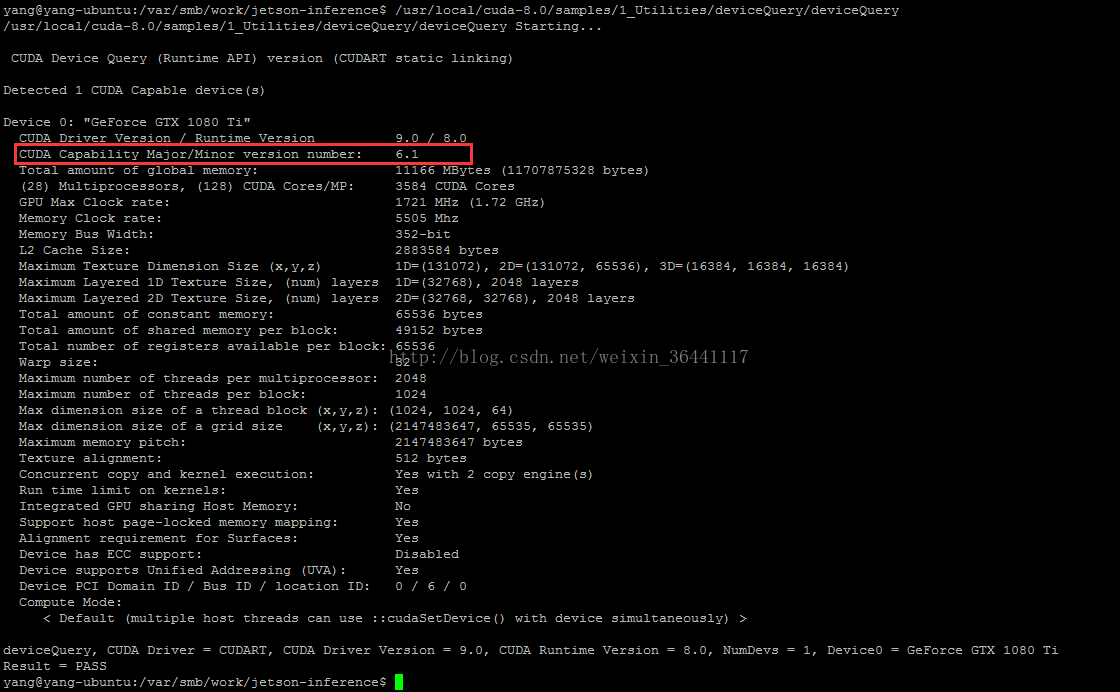
这边可以看到capability是6.1
再来编辑 jetson-inference/CMakeLists.txt 文件的37行左右
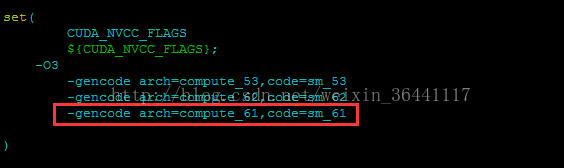
增加上我框起来的这行,后面的61就是前面你看到的capability版本号,
都修改完了继续
$ cd build
$ cmake ../
$ make
这样就能正常编译完成
$ cd x86_64/bin/
$ ./imagenet-console orange_0.jpg output.jpg
就可以看到结果了。