
当你要监视一台Linux机器时,你会有很多的选择。虽然现在有很多产品质量监控方案(比如 Nagios、 Zabbix、 Zenoss),它们拥有华丽的UI,可扩展监控,易于理解的报告等等,这些方案对于大多数终端用户都太过于强大了。如果你只需检查Linux服务器或桌面的基本状态(比如,CPU负载、内存使用、活跃进程),就请考虑一下linux-dash:https://github.com/afaqurk/linux-dash
linux-dash是一款面向Linux机器的基于web的轻量级监控面板,可以实时显示不同的系统属性,比如CPU负载、内存使用、磁盘使用、网络速度、网络连接、上下行带宽、登录用户、运行中的进程等等。linux-dash没有后端数据库库来存储长期统计。在任何已有的web服务器(如Apache、Nginx)上运行linux-dash,你就可以用了。这是一个快速又简单的方法来对个人项目进行远程监控。
在这篇教程中,我会描述如何在Linux的Nginx web服务器上设置linux-dash。这里用Nginx,而不是Apache,是因为它更轻量。
在Debian、Ubuntu或者Linux Mint上设置linux-dash
首先,安装带php-fpm的Nginx web服务器。
$ sudo apt-get install git nginx php5-json php5-fpm php5-curl
为linux-dash创建如下Nginx配置文件/etc/nginx/conf.d/linuxdash.conf。 本例中,我们使用8080端口。
$ sudo vi /etc/nginx/conf.d/linuxdash.conf
server {
server_name $domain_name;
listen 8080;
root /var/www;
index index.html index.php;
access_log /var/log/nginx/access.log;
error_log /var/log/nginx/error.log;
location ~* \.(?:xml|ogg|mp3|mp4|ogv|svg|svgz|eot|otf|woff|ttf|css|js|jpg|jpeg|gif|png|ico)$ {
try_files $uri =404;
expires max;
access_log off;
add_header Pragmapublic;
add_header Cache-Control"public, must-revalidate, proxy-revalidate";
}
location /linux-dash {
index index.html index.php;
}
# PHP-FPM via sockets
location ~ \.php(/|$){
fastcgi_param SCRIPT_FILENAME $document_root$fastcgi_script_name;
fastcgi_split_path_info ^(.+?\.php)(/.*)$;
fastcgi_pass unix:/var/run/php5-fpm.sock;
if(!-f $document_root$fastcgi_script_name){
return404;
}
try_files $uri $uri//index.php?$args;
include fastcgi_params;
}
}
禁止默认站点配置。
$ sudo rm /etc/nginx/sites-enabled/default
编辑/etc/php5/fpm/pool.d/www.conf来配置php-fpm。确保按如下编辑"user", "group" 和 "listen"指令。你可以不改变剩下的配置。
$ sudo vi /etc/php5/fpm/pool.d/www.conf
user = www-data
group= www-data
listen =/var/run/php5-fpm.sock
开始下载并安装linux-dash。
$ git clone https://github.com/afaqurk/linux-dash.git
$ sudo cp -r linux-dash/ /var/www/
$ sudo chown -R www-data:www-data /var/www
重启Nginx与php-fpm来完成安装。
$ sudo service php5-fpm restart
$ sudo service nginx restart
在CentOS、Fedora、RHEL上设置linux-dash
在CentOS上,需要首先启用EPEL仓库
安装Nginx与php-fpm组件。
$ sudo yum install git nginx php-common php-fpm
为linux-dash程序配置Nginx,如下创建/etc/nginx/conf.d/linuxdash.conf
$ sudo vi /etc/nginx/conf.d/linuxdash.conf
server {
server_name $domain_name;
listen 8080;
root /var/www;
index index.html index.php;
access_log /var/log/nginx/access.log;
error_log /var/log/nginx/error.log;
location ~* \.(?:xml|ogg|mp3|mp4|ogv|svg|svgz|eot|otf|woff|ttf|css|js|jpg|jpeg|gif|png|ico)$ {
try_files $uri =404;
expires max;
access_log off;
add_header Pragmapublic;
add_header Cache-Control"public, must-revalidate, proxy-revalidate";
}
location /linux-dash {
index index.html index.php;
}
# PHP-FPM via sockets
location ~ \.php(/|$){
fastcgi_param SCRIPT_FILENAME $document_root$fastcgi_script_name;
fastcgi_split_path_info ^(.+?\.php)(/.*)$;
fastcgi_pass unix:/var/run/php-fpm.sock;
if(!-f $document_root$fastcgi_script_name){
return404;
}
try_files $uri $uri//index.php?$args;
include fastcgi_params;
}
}
接下来,编辑/etc/php-fpm.d/www.conf来配置php-fpm。在这个文件中,确保按如下编辑"user", "group" 和 "listen"字段。你可以不改变剩下的配置。
$ sudo vi /etc/php-fpm.d/www.conf
listen =/var/run/php-fpm.sock
user = nginx
group= nginx
在/var/wwwx下载并安装linux-dash。
$ git clone https://github.com/afaqurk/linux-dash.git
$ sudo cp -r linux-dash/ /var/www/
$ sudo chown -R nginx:nginx /var/www
最后,重启Nginx和php-fpm,并设置开机自启。
$ sudo service php-fpm restart
$ sudo service nginx restart
$ sudo chkconfig nginx on
$ sudo chkconfig php-fpm on
在本例中,我们已经配置linux-dash使用TCP端口8080。所以确保防火墙没有阻止TCP 8080端口。
用linux-dash监视Linux机器
要在web浏览器上访问linux-dash,只需在web浏览器中输入http://<linux ip地址>:8080/linux-dash/
下面是linux-dash的截图。web面板包含了几个小部件,每个都会显示特性的系统参数。你可以通过重安排并且/或者关闭一些小部件来自定义web面板的外观。http://afaq.dreamhosters.com/linux-dash/是一个linux-dash创建者的演示站点。
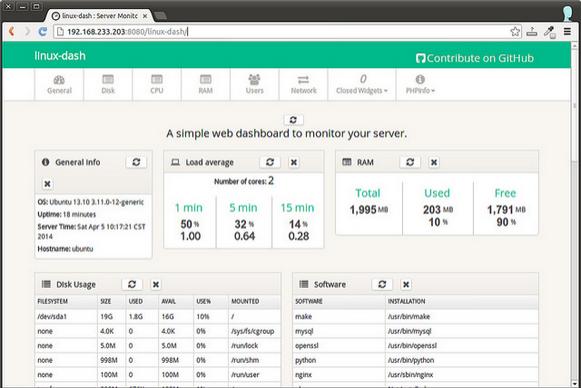
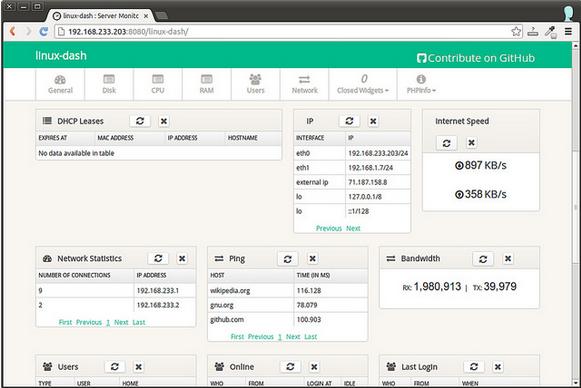
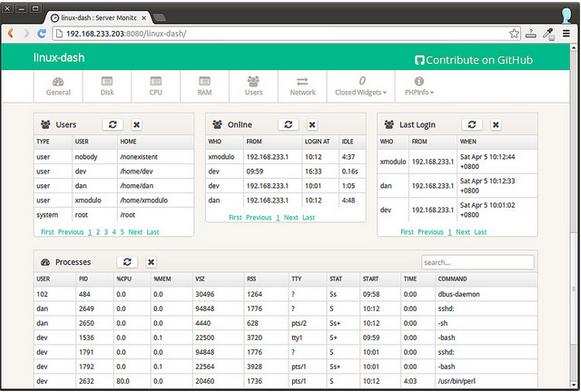
注:以上图片上传到红联Linux系统教程频道中。
How to set up EPEL repository on CentOS
If you are using CentOS or RHEL, it is strongly recommended that you configure EPEL (Extra Packages for Enterprise Linux) repository on your system. EPEL is a community effort to create a repository of high-quality add-on freeware packages for RHEL-based distributions. Once you set up EPEL repository, you can use yum command to install any of close to 7,000 EPEL packages.
In order to enable EPEL repository on your CentOS system, you need to check CentOS version. To do that, run the following command.
$ cat /etc/RedHat-release
CentOS release 6.3 (Final)
Then install an EPEL repository rpm file as follows. Note that the rpm file does not depend on the underlying processor architecture (e.g., 32-bit/64-bit x86, ppc, sparc, alpha, etc), so no need to pay attention to processor architecture difference.
For CentOS 5.*:
$ sudo rpm -Uvh http://mirrors.kernel.org/Fedora-epel/5/i386/epel-release-5-4.noarch.rpm
For CentOS 6.*:
$ sudo rpm -Uvh http://mirrors.kernel.org/fedora-epel/6/i386/epel-release-6-8.noarch.rpm
To verify that EPEL yum repository has been set up successfully, run the following command to list all available repositories on your system.
$ yum repolist
repo idrepo name status
base CentOS-6 - Base4,776
epel Extra Packages for Enterprise Linux 6 - i386 6,913
extras CentOS-6 - Extras 17
updatesCentOS-6 - Updates 960
repolist: 12,666